I1. Instruments general options
The top of the Instruments tab page (Fig. 1) contains a Search bar (1) for filtering by the name of the instruments whose thumbnails will be displayed (3). At the top of the page (2) there are also general options related to Instruments.
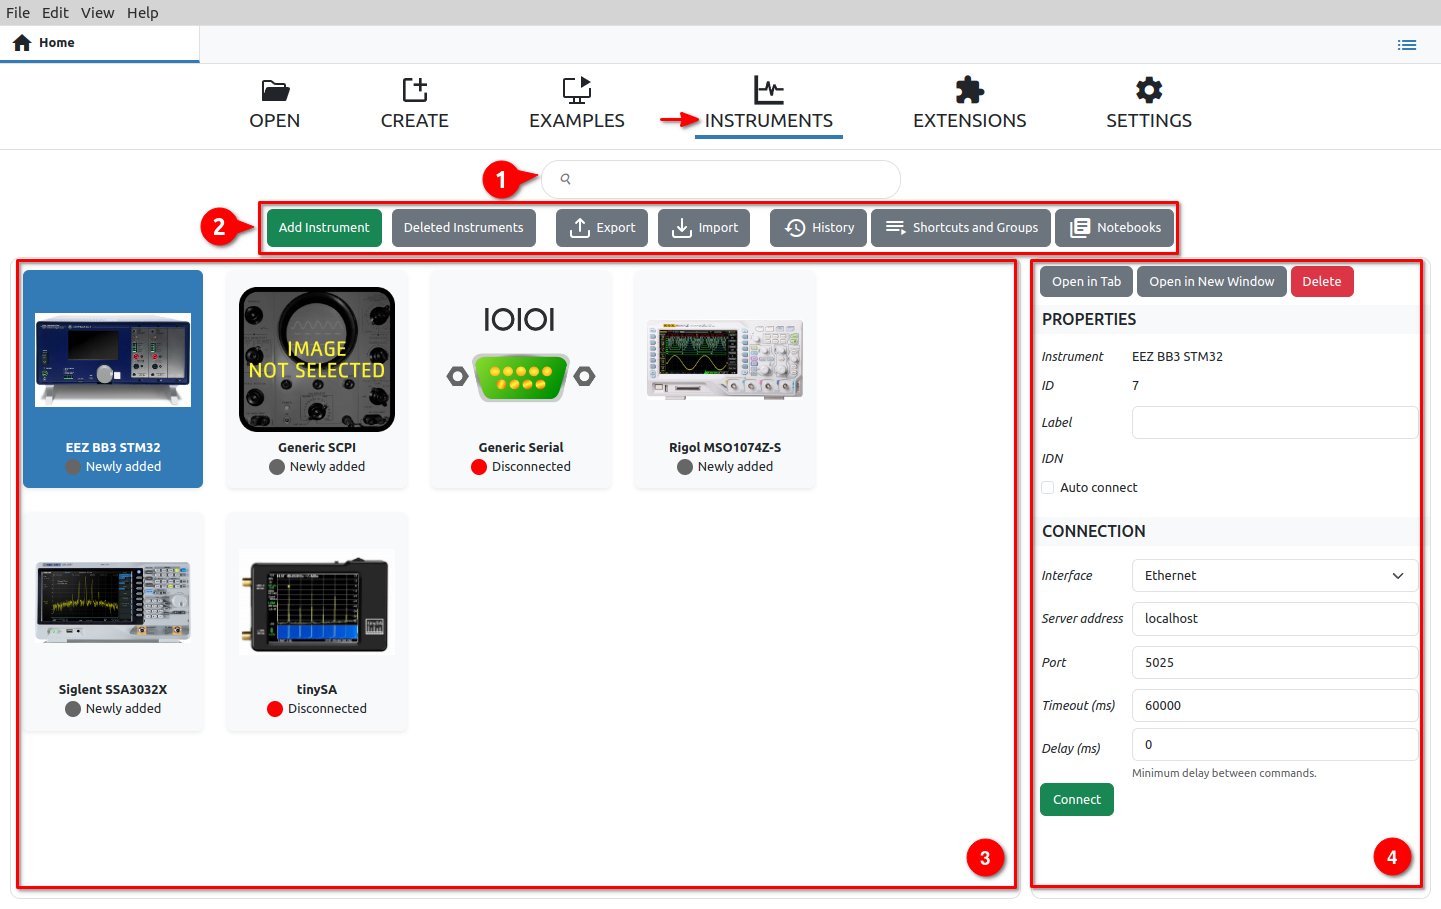
Fig. 1: Home page instrument options
I1.1. History
History displays communication via the Terminal option for all instruments in one place. In this way, it will be easier to search all activities as well as to add notes, files and graphs (1) in the same way as in the Terminal of the currently selected instrument, as will be described below.
History can be searched (2) and several options are offered for positioning to a certain position in history according to different criteria, which are displayed in separate tabs (3).
In order to display the requested part of history faster, it is not loaded in its entirety, but only as many items as fit in the window. For navigation, in addition to the Scroll bar and navigation keys on the keyboard, it is possible to use the More (4) and Jump To Present (5) buttons.
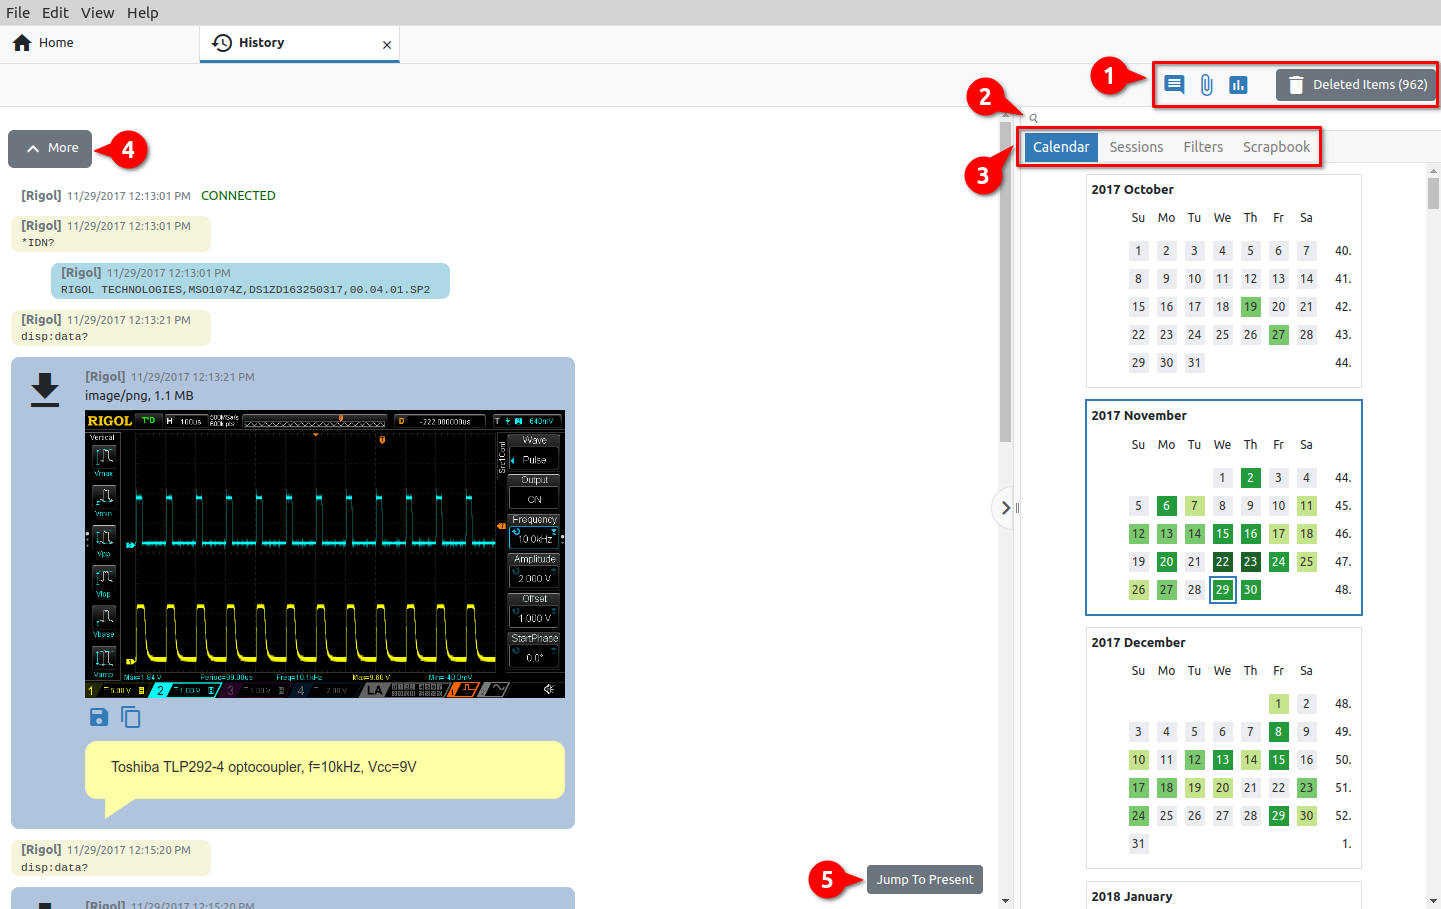
Fig. 2: Instruments History view
I1.1.1. History search
To search history, we need to enter the phrase we are looking for, when a new Search results tab will be displayed with all the items that contain the searched phrase. For example in Fig. 3, a search with "no load" returned two items. Clicking on an item positions us on the item in history.
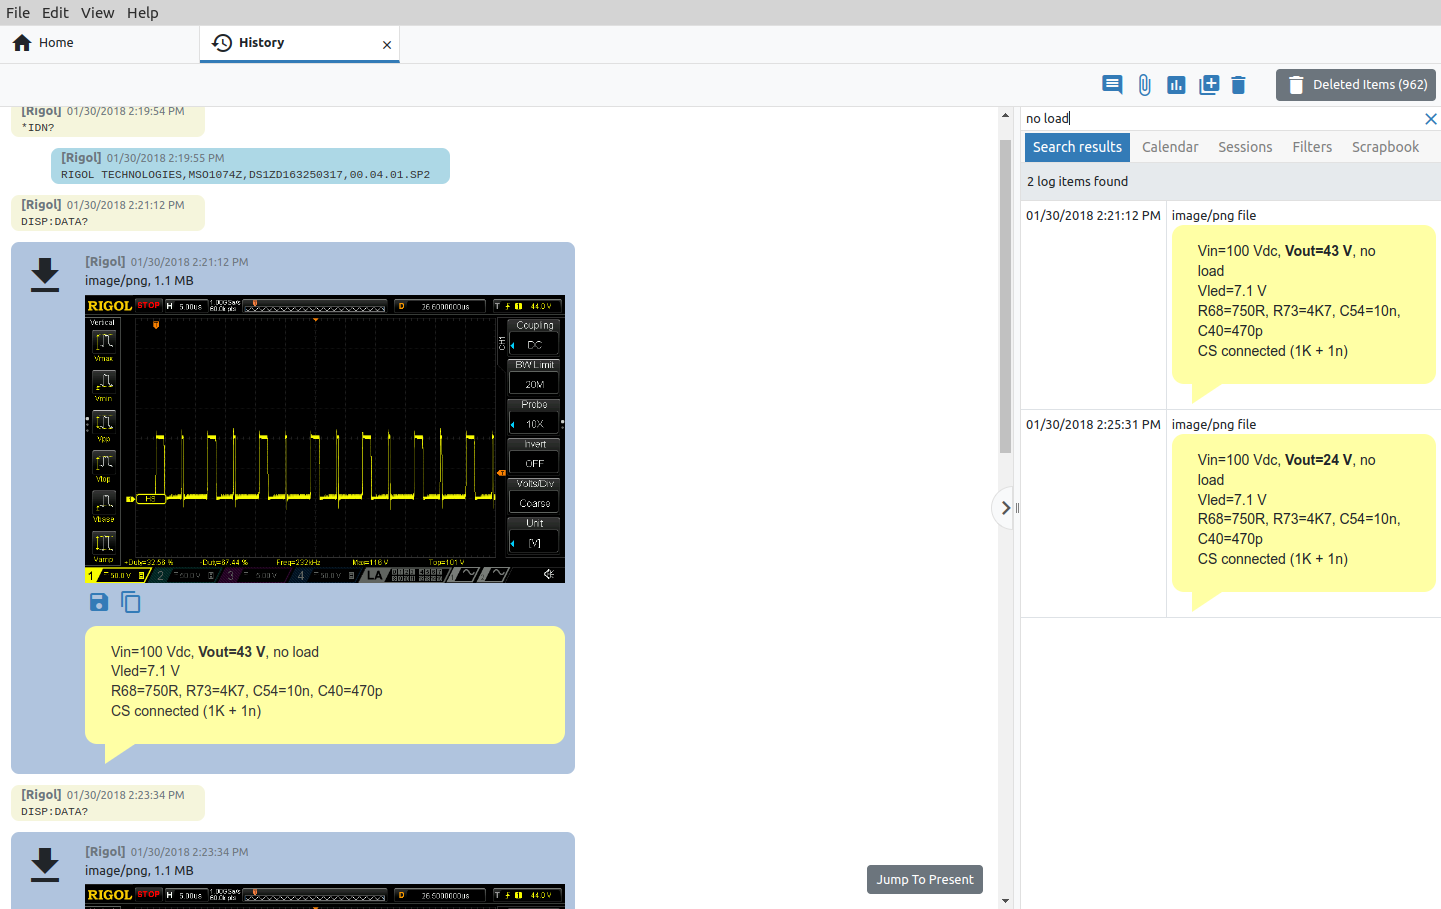
Fig. 3: Instrument history search results
I1.1.2. Instrument sessions
Sessions (Fig. 4) are offered to simplify the process of documenting and navigating the history of working with instruments. A new session can be created (1) at any time and preferably contains a description of the task to be started in its name. The name can be edited later (2), and the session can be deleted (3). Deleted sessions go first to trash (4) from where they can be restored or deleted forever.
The list of sessions shows the time of the last use (Last Activity column) in addition to the name. The list can be sorted in descending or ascending order.
If we do not want to work with sessions or we want to display all items from the history, it is necessary to select FREE MODE from the list of sessions (5).
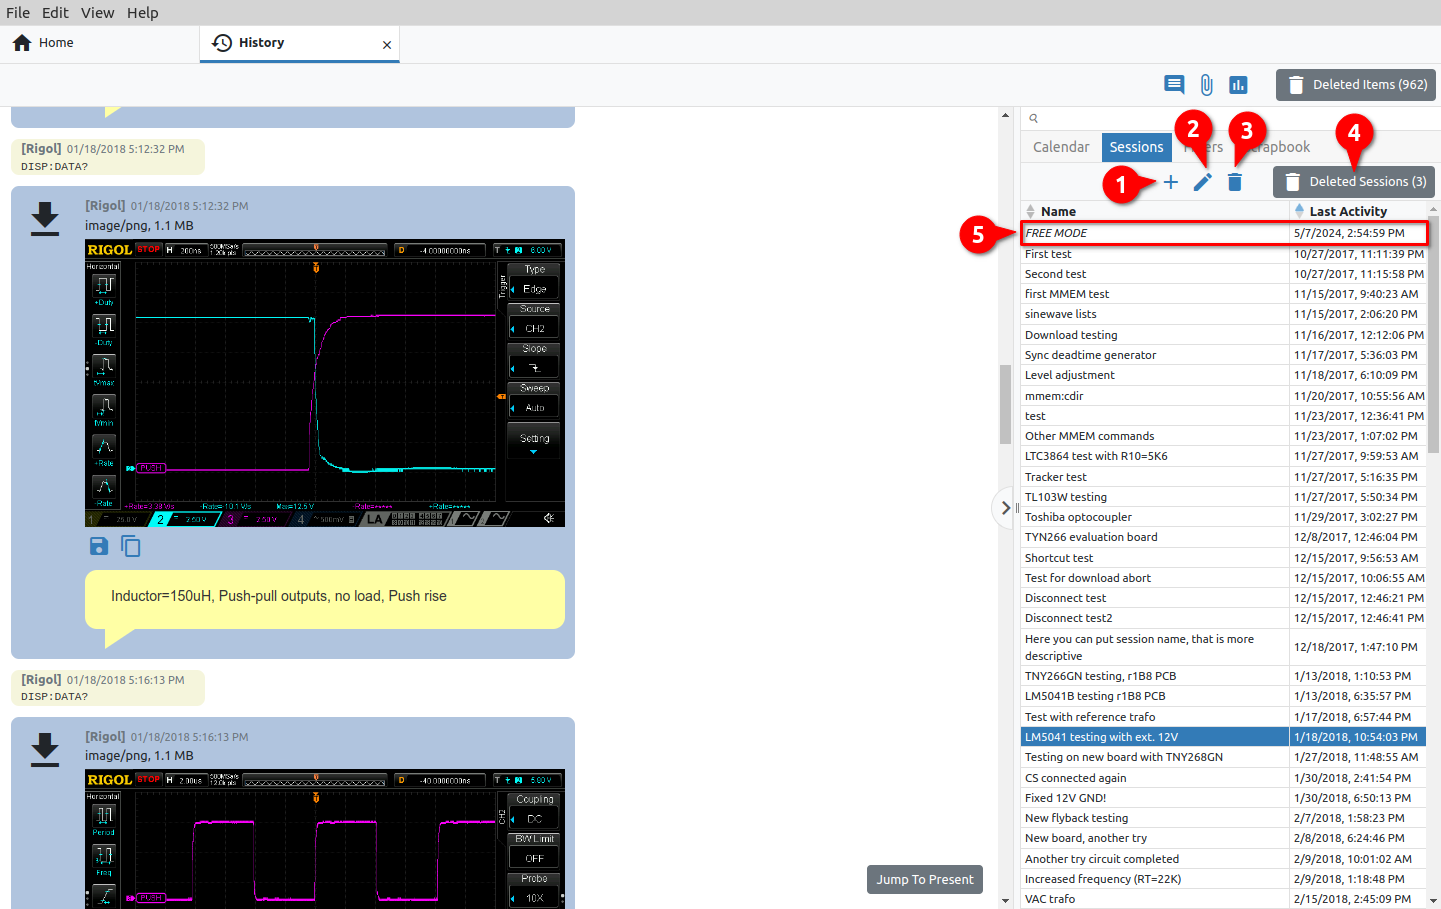
Fig. 4: Instrument sessions
An indication of an active session will be visible in any Instrument tab. In the example in Fig. 5 shows that the session with the name new session is active.
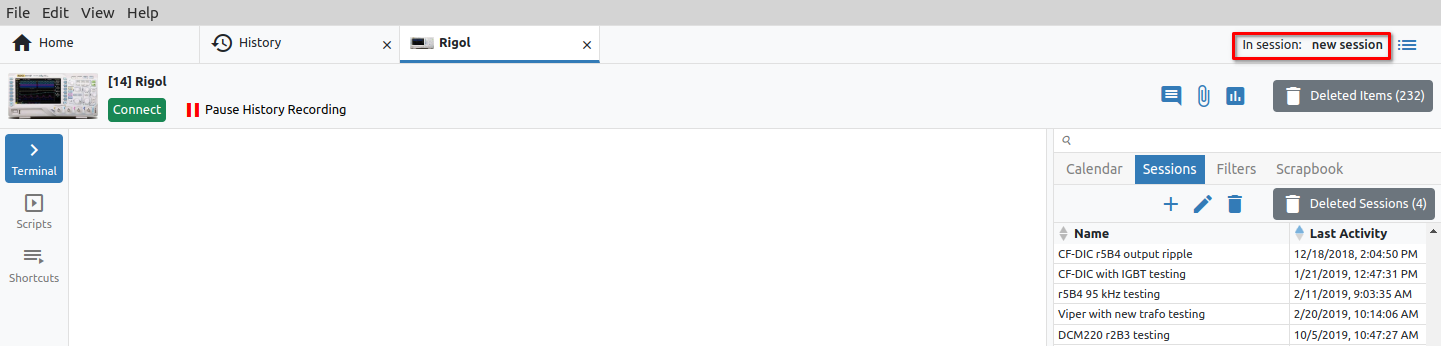
Fig. 5: Indication of an active session
I1.1.3. History filters
The Filters tab shows the names of all types of History items and the number of them found in the database. Here we can select which of them will be displayed in the History view on the left (Fig. 6).
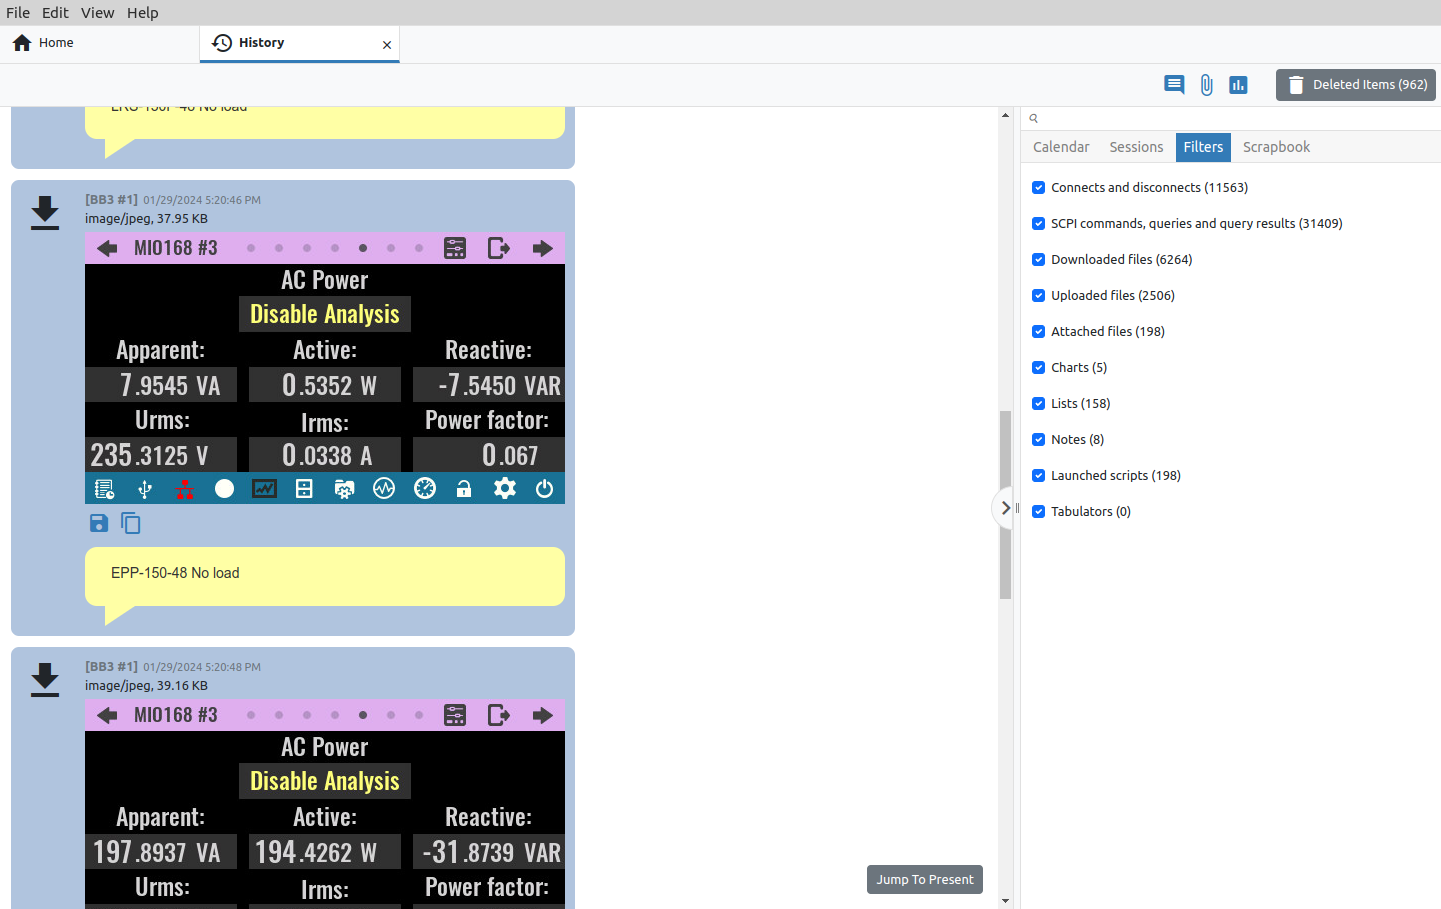
Fig. 6: History view filters
I1.1.4. Instrument Scrapbook
The instrument scrapbook (Fig. 7) is a convenient way to have important items from the history at hand, regardless of which instrument we are working with and which session we are in.
To add an item to the scrapbook, it is enough to select the item from the History view and drag&drop it into the Scrapbook tab area, where the thumbnail of the item will appear. We use the Thumbnail size option to determine the size of the displayed item in the Scrapbook.
Please note that the Instrument scrapbook is in no way related to Project Scrapbook described in P3.2.
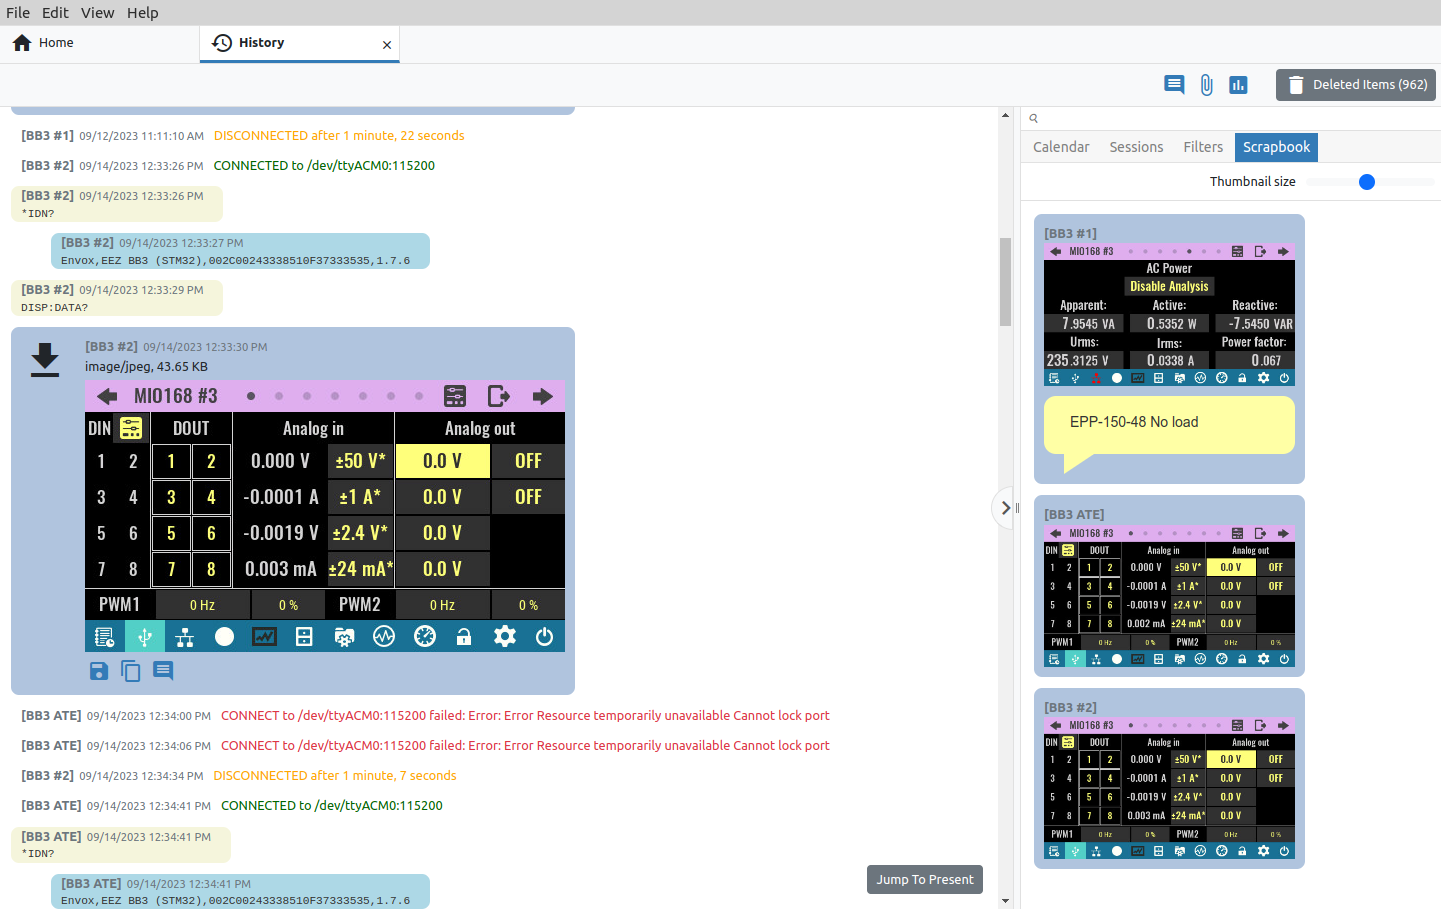
Fig. 7: Instrument scrapbook
I1.2. Shortcuts and Groups
Just like with History, Shortcuts and Groups is not a system feature, but only displays the available shortcuts and their groups in one place for easier searching, editing, deleting and adding new shortcuts and their groups.
Therefore, all operations with shortcuts on this page are possible as via the Shortcuts page of the currently selected instrument, which will be described below.
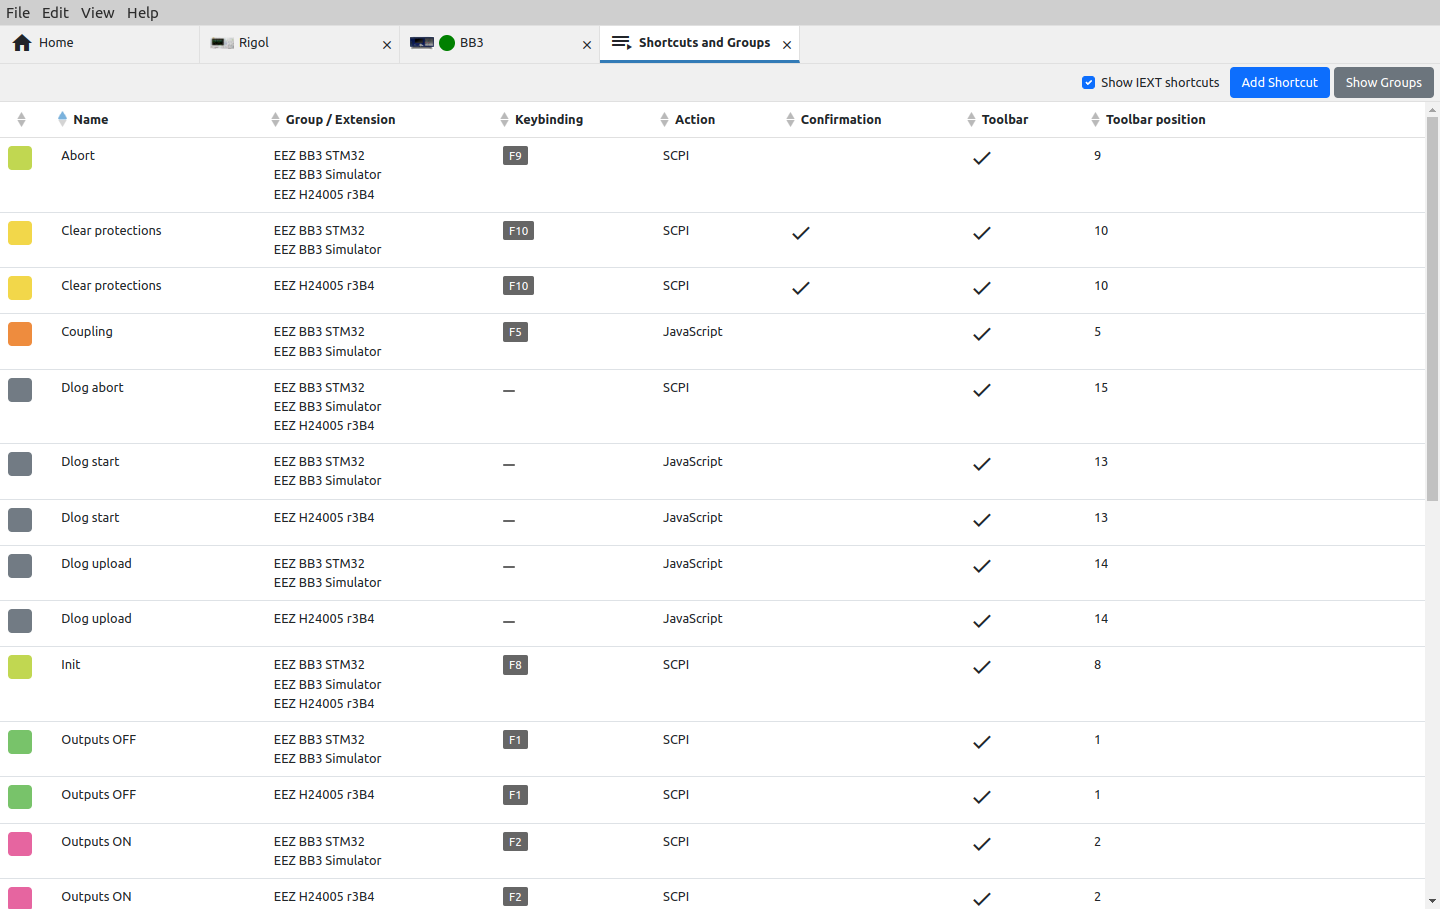
Fig. 8: Instruments Shortcuts and Groups view
I1.3. Notebooks
The Notebooks feature enables data collected from one or more sources (instruments) to be stored and presented in one place. Data stored in this way can be searched as if they belonged to a single source. Notebooks can also be appended, exported and imported, which facilitates the exchange of collected data.
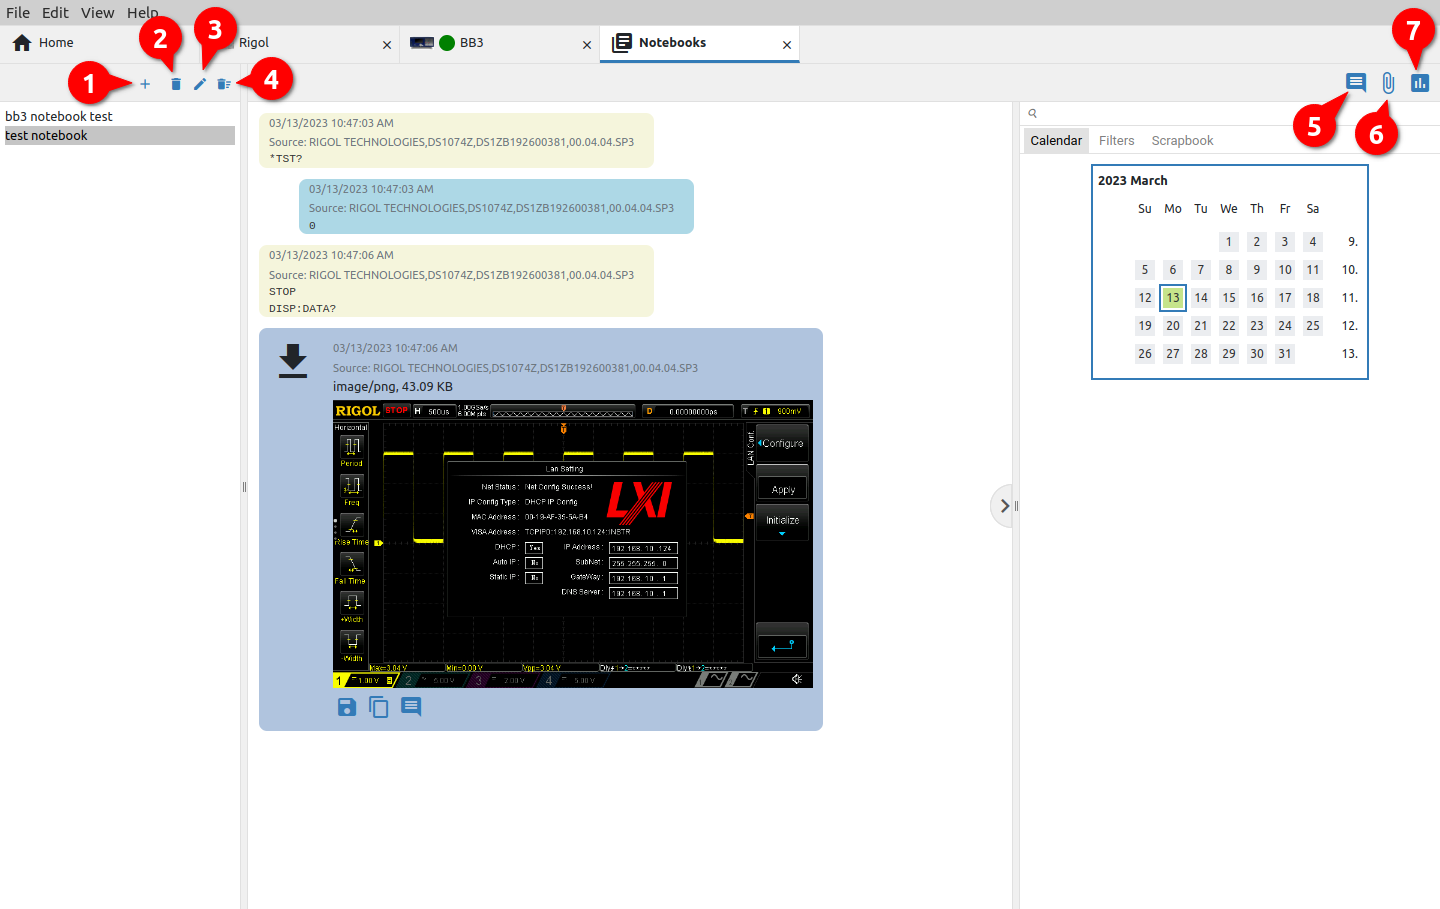
Fig. 9: Instrument Notebooks view
|
# |
Option |
Description |
|
1 |
Add / Import notebook |
Create a new blank notebook or import a notebook file. When creating a new notebook, you will need to enter a name. To import data into a notebook, use the Notebook option in the instrument’s Terminal, as shown in Fig. 11: (1) go to the Terminal tab in the Action bar, (2) select one or more items and (3) export them to a notebook file, a new notebook or an already created notebook. In the case of exporting to a file, it will be necessary to choose a destination on the local storage, and in the case of exporting to a new notebook, the name of the notebook should be entered. |
|
|
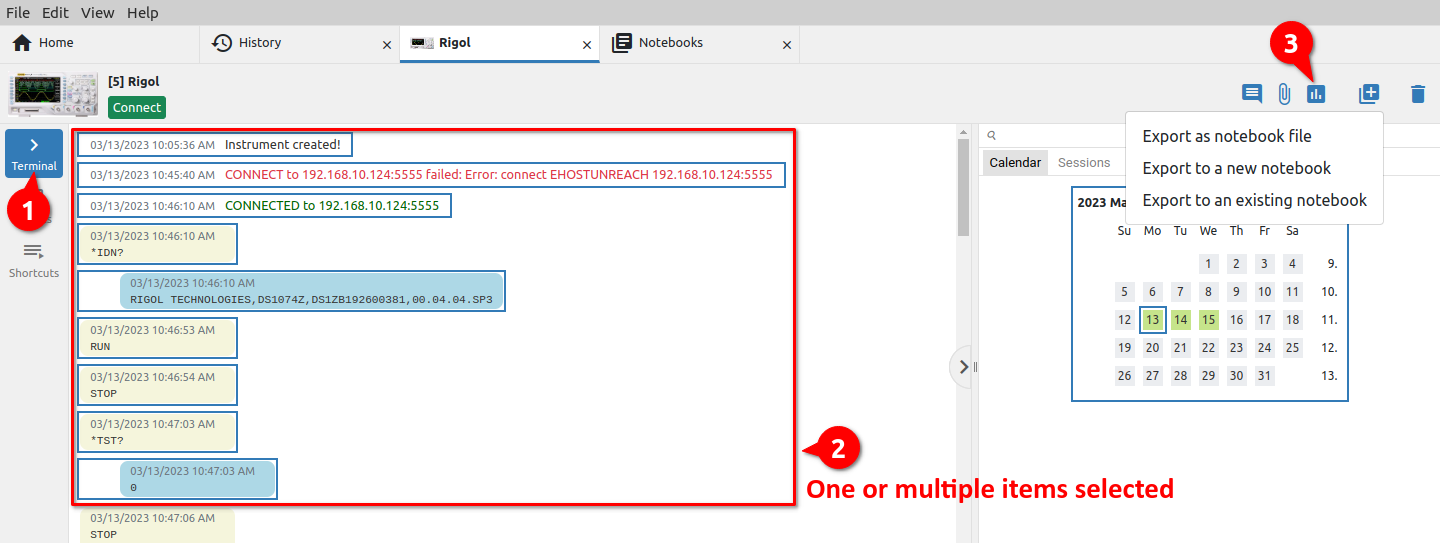 Fig. 10: Adding items to the notebook
|
|
|
2 |
Remove notebook |
Remove the notebook from the list. |
|
3 |
Change notebook name |
Change notebook name. |
|
4 |
Show deleted notebooks |
Notebooks that have been removed from the list are not immediately deleted from the database. This option enables the display of all notebooks (Fig. 11) that have been removed from the list and offers the possibility to restore (return to the list) or permanently delete the notebook. |
|
|
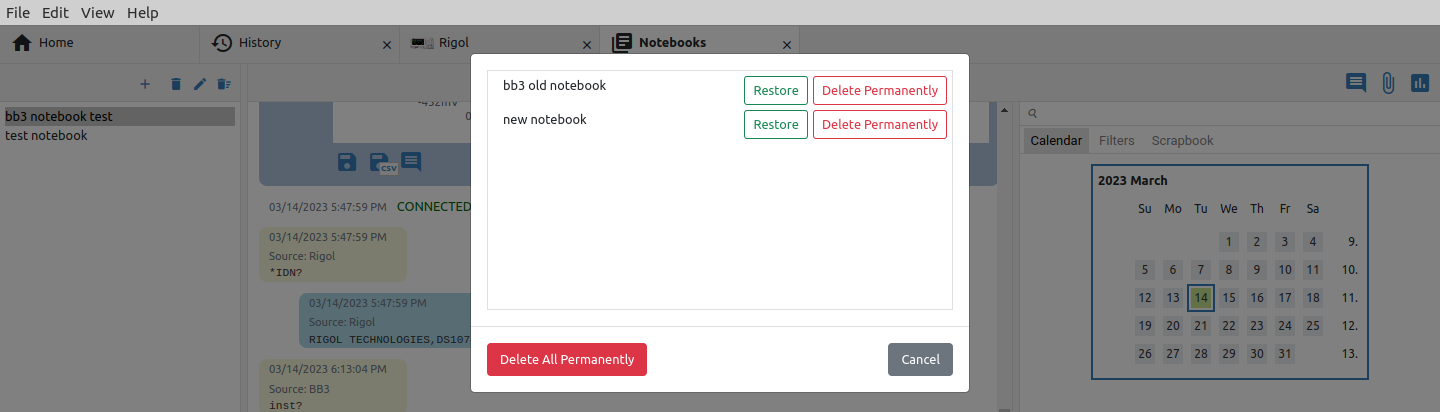 Fig. 11: Deleted notebooks
|
|
|
5 |
Add note |
Adding a note to the notebook (Fig. 12). The number of notes is not limited and the last added note will appear at the bottom of the notebook (Fig. 13). |
|
|
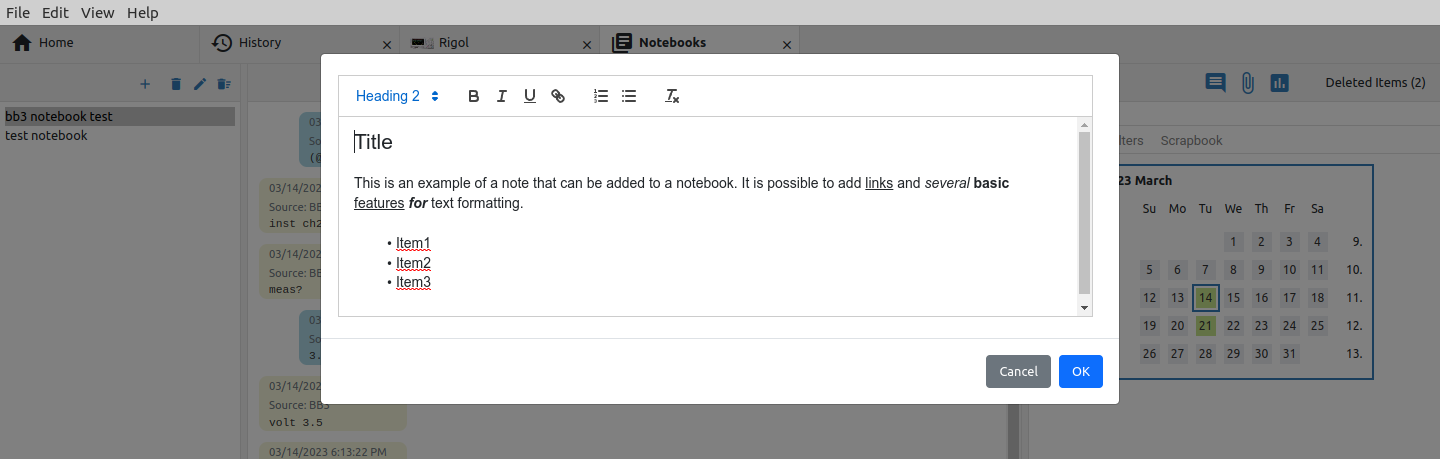 Fig. 12: Adding a new note to the notebook
|
|
|
|
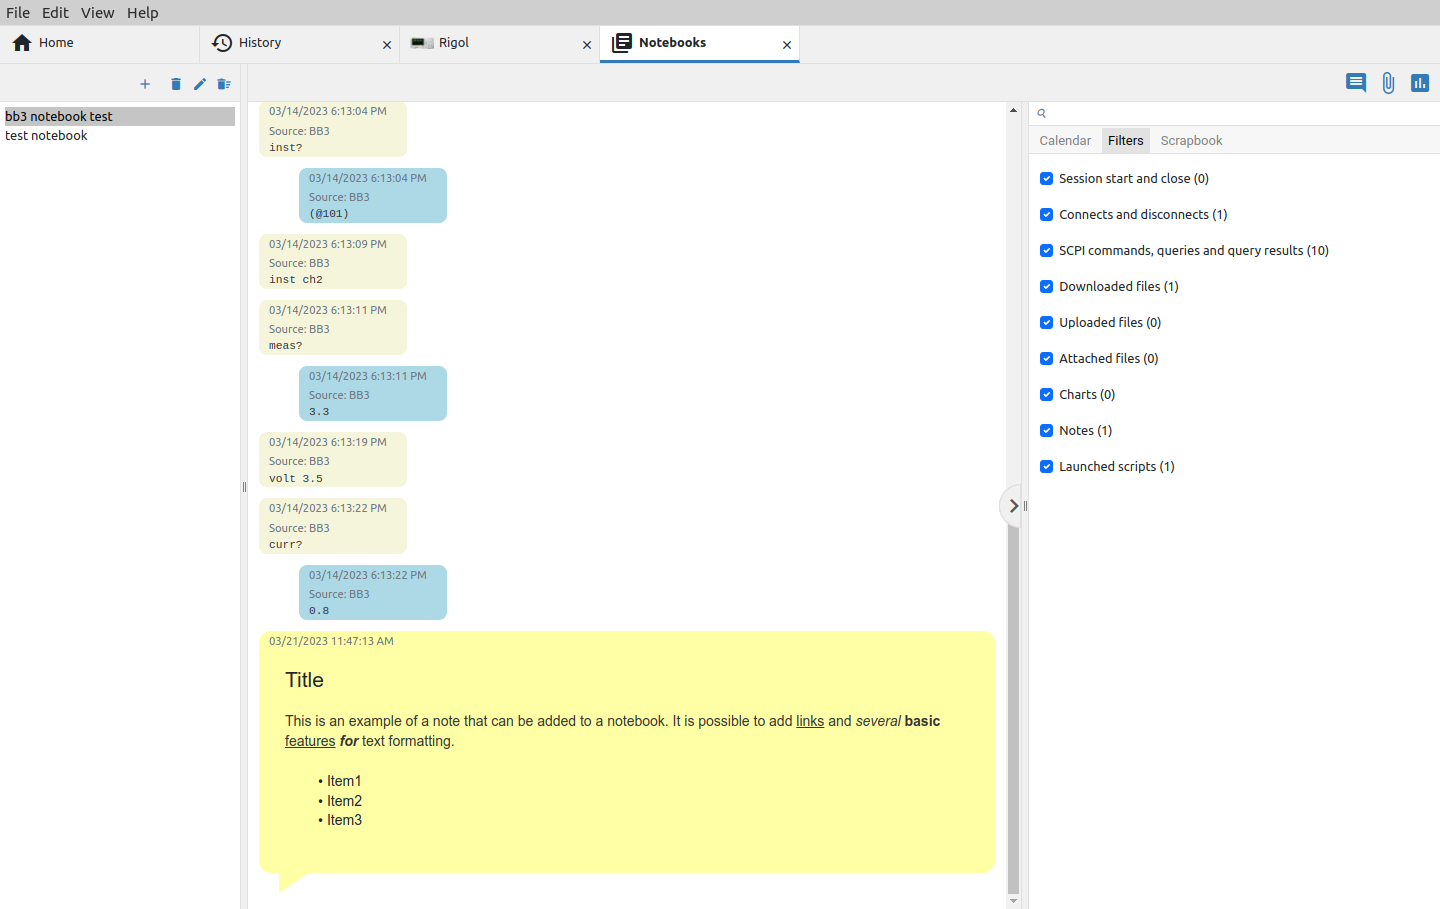 Fig. 13: Newly added note in the notebook
|
|
|
6 |
Attach file |
Different files from local storage can be added to the notebook. In this way, all relevant data collected with the instruments can be combined together with images, recordings, datasheets into a whole that can be searched and further shared.
All imported files are marked with a paper clip icon in the upper left corner. It also displays the full path from where the file was imported as well as its size (Fig. 14).
Files whose format EEZ Studio can recognize (.jpeg, .png, etc.) also have a preview. Such files, in addition to the option to save to local storage and to add a note, will also have the option to copy to the clipboard.
|
|
|
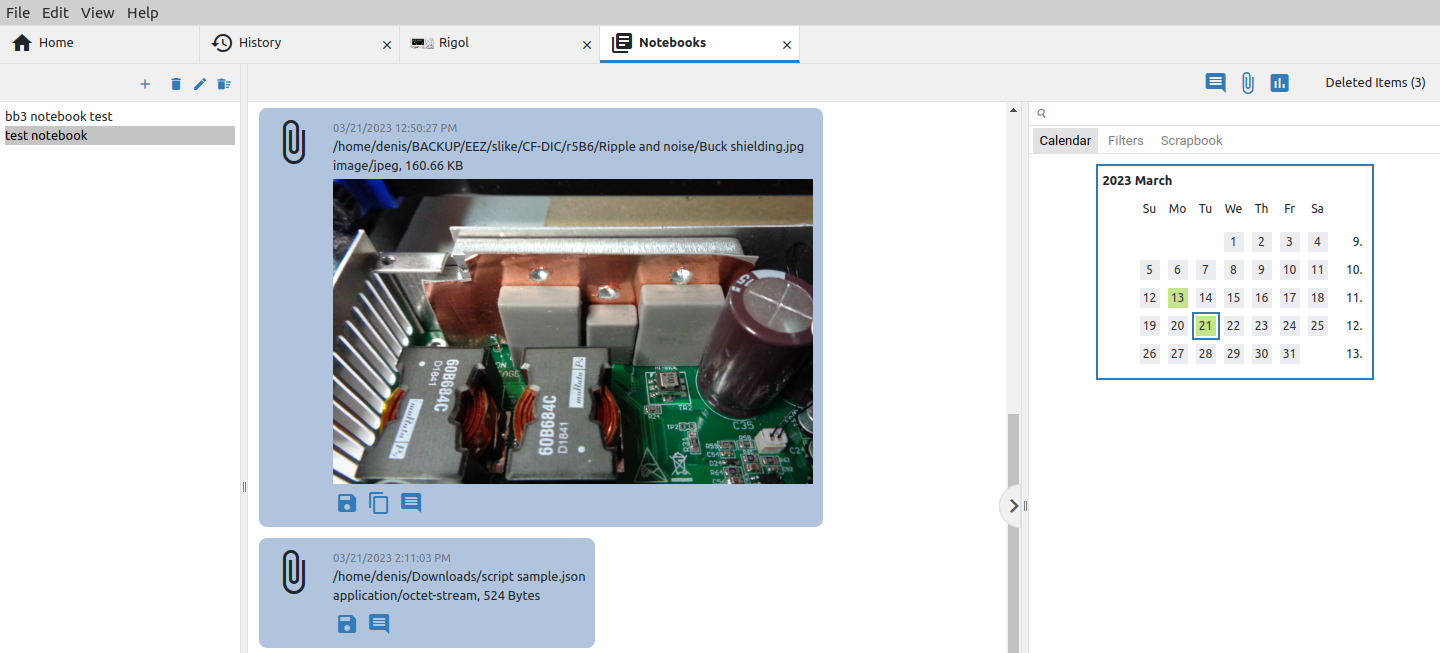 Fig. 14: Files imported into the notebook
|
|
|
7 |
Add chart |
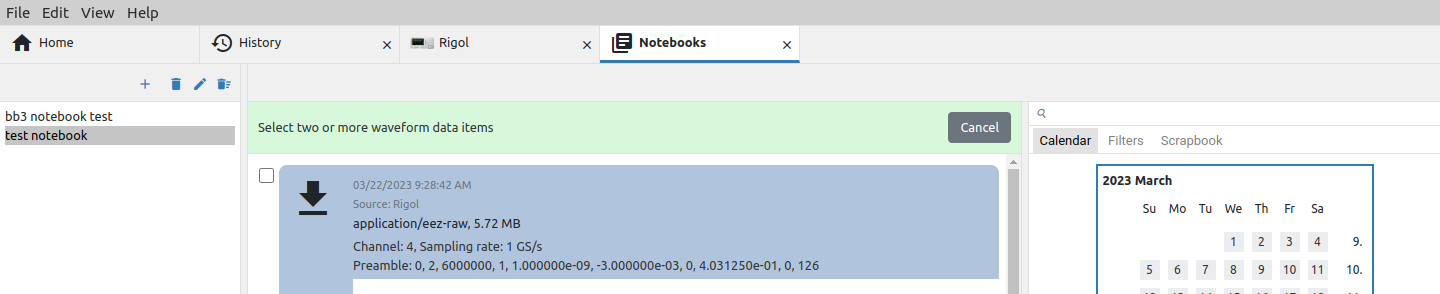
This option allows you to create a new graph from two or more existing ones and add it to the notebook. To create a new graph, you will need to select at least two of the found graphs in the currently selected notebook (1, 2) and add it to the notebook (3) as shown in Fig. 15. |
|
|
|
|
|
|
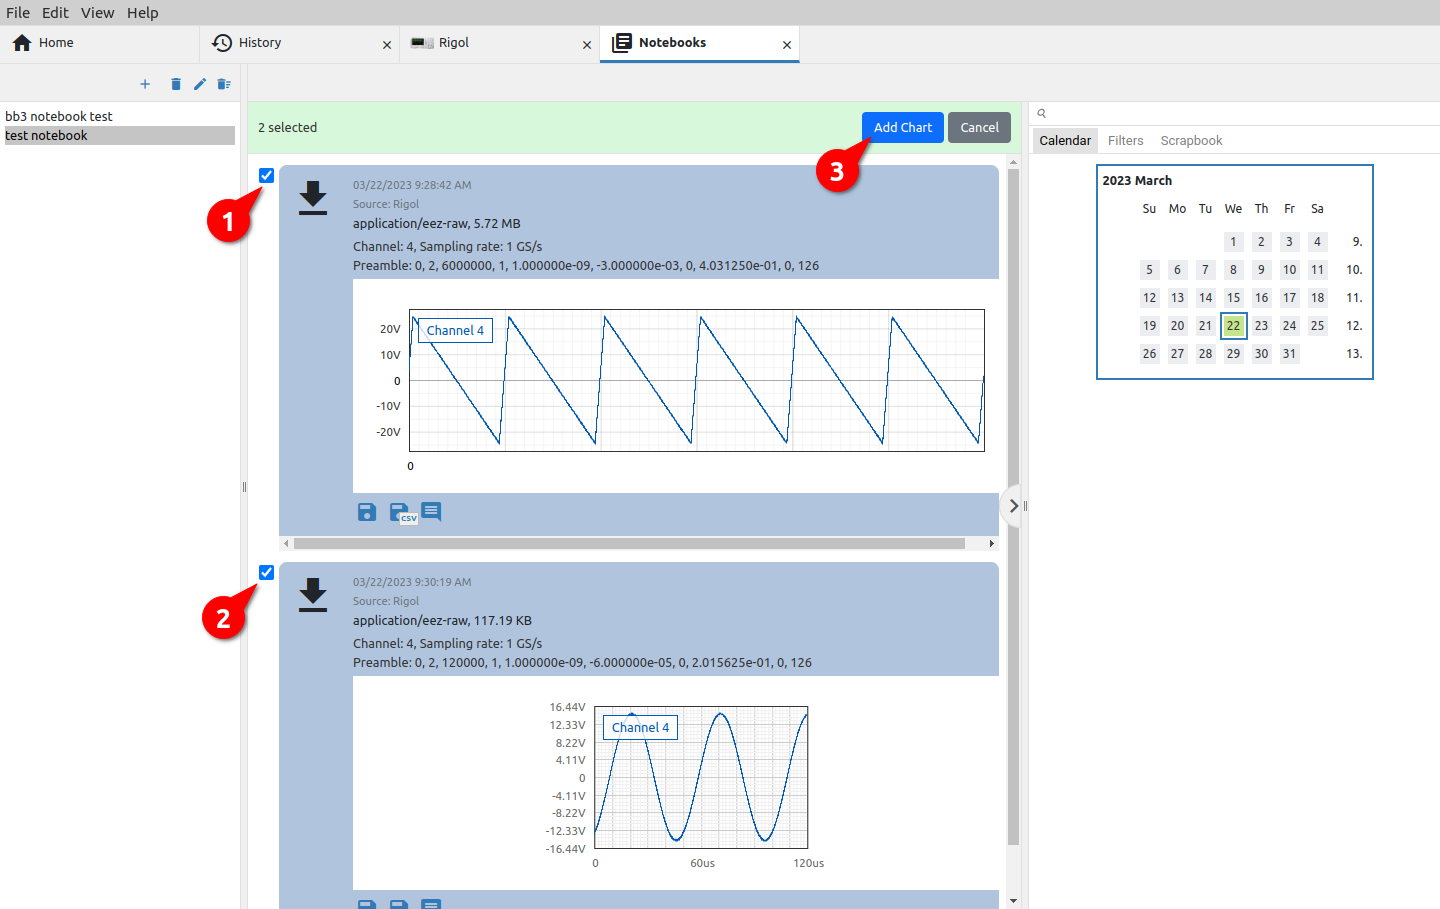 Fig. 15: A selection of graphs to add to the notebook
|
|
|
|
|
A successfully created graph will appear at the end of the notebook and will have a graph icon in the upper left corner (Fig. 16). |
|
|
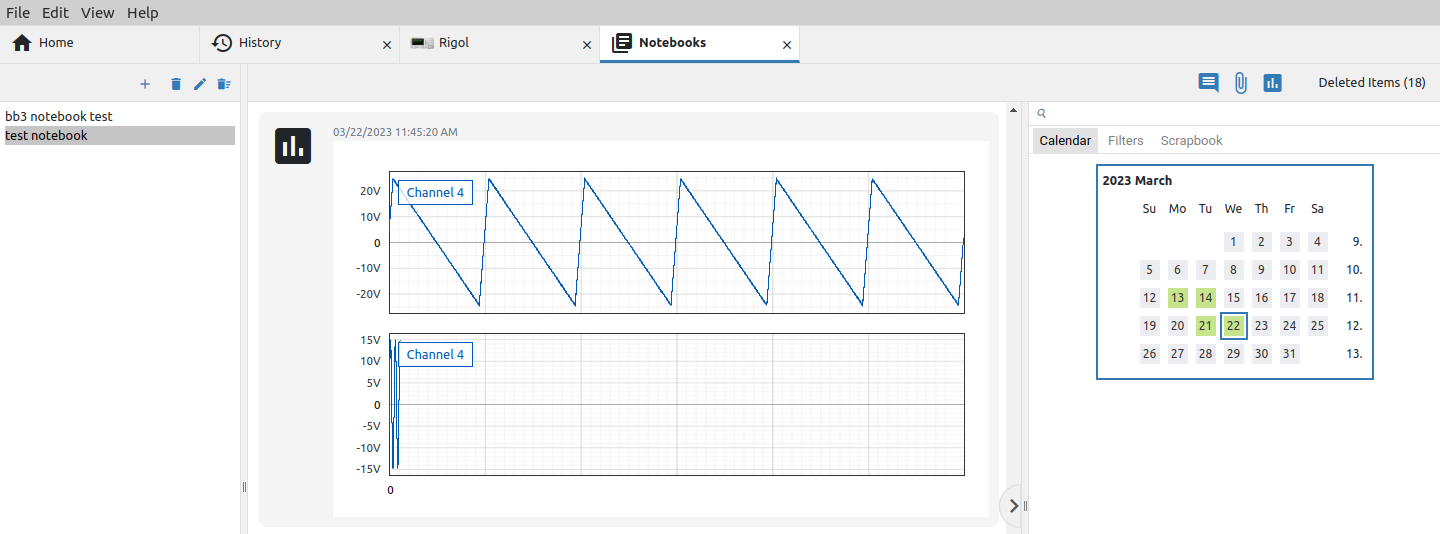 Fig. 16: Newly created graph added to notebook
|
|
I1.4. Items purge and restore
Items that are removed from the list are not immediately deleted from the database, which leaves the possibility to restore them if needed. The counter of deleted items that can be restored appears in the right corner as shown in Fig. 17.
The counter can be seen in Notebooks but also in the Terminal tab of the currently selected instrument, and the same rules apply to restore or purge items in both places.

Fig. 17: Deleted items counter
When there are items to delete, they can be accessed by clicking on the counter, when the option to purge all items will first appear (Fig. 18).

Fig. 18: Empty trash option (no selected items)
If one or more items are selected from the list of deleted items, options for restore (2) or purge (3) will appear (Fig. 19).
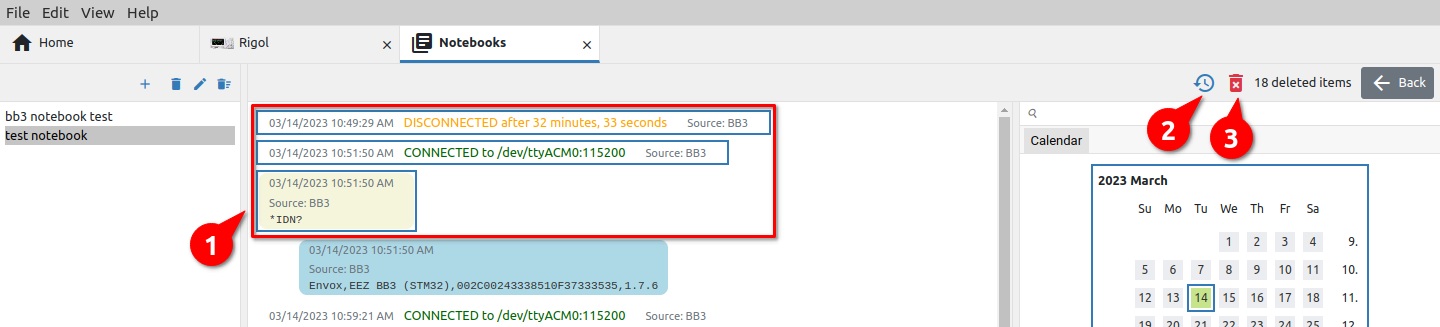
Fig. 19: Selection of deleted items for restore or purge
I1.5. Instrument Extension (IEXT) Manager
The EEZ Studio use Instrument Extensions (IEXTs) to make communication and control of various instruments easier and more efficient. EEZ Studio comes with IEXTs for several instruments including EEZ H24005, EEZ BB3 as well as Generic SCPI which can be used for basic operations such as connection testing and sending commands and queries. (e.g. *IDN?).
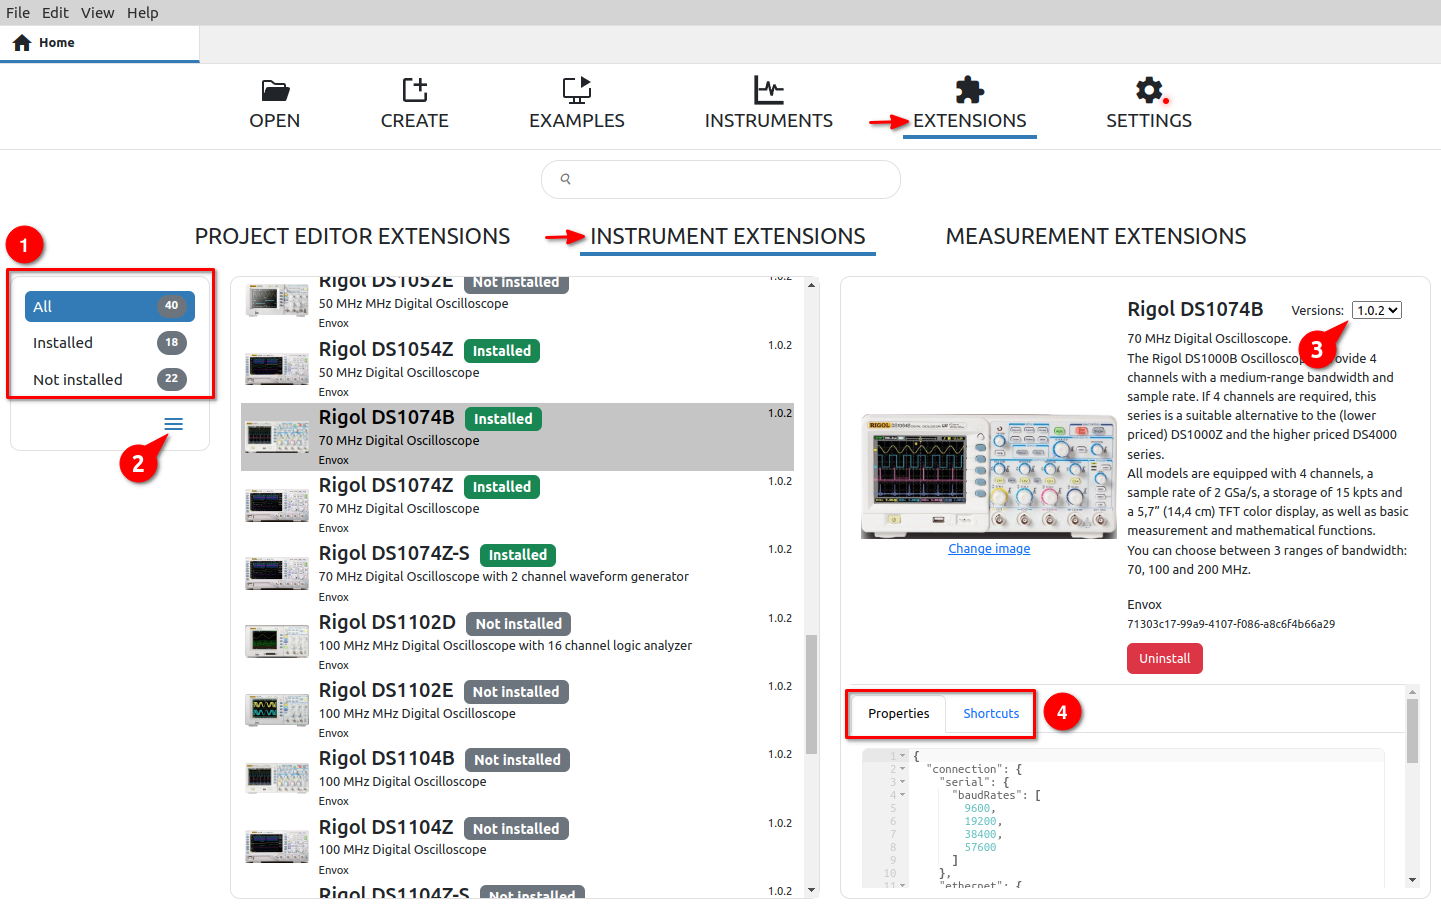
Fig. 20: Instrument extension (IEXT) Manager view
|
# |
Option |
Description |
|
1 |
View |
Filters for displaying IEXT in the list: it is possible to display all, only installed or only those that are not installed. The number of filtered IEXTs is displayed next to each option. |
|
2 |
Update / Install actions |
All approved IEXTs are in the catalog on GitHub, with which EEZ Studio synchronizes its catalog every time it is started. Synchronization with the IEXT catalog can also be started manually at any time using the Upgrade Catalog option. The Install extension option allows installing an IEXT that is not in the catalog (from local storage). |
|
3 |
Versions |
IEXT can have multiple versions. If there is more than one, it is possible to change the installed IEXT with one of the versions from the list. In this case, the Replace option will appear as in Fig. 21.
|
 Fig. 21: Changing installed IEXT version
|
||
|
4 |
Properties |
IEXT for a supported instrument can have several properties that will be displayed below the IEXT description. All displayed properties are for informational purposes and cannot be changed here. |
I1.6. Add instrument
By using Add instrument (Fig. 1), only those instruments for which there is an IEXT in the IEXT catalog can be added to the workbench.
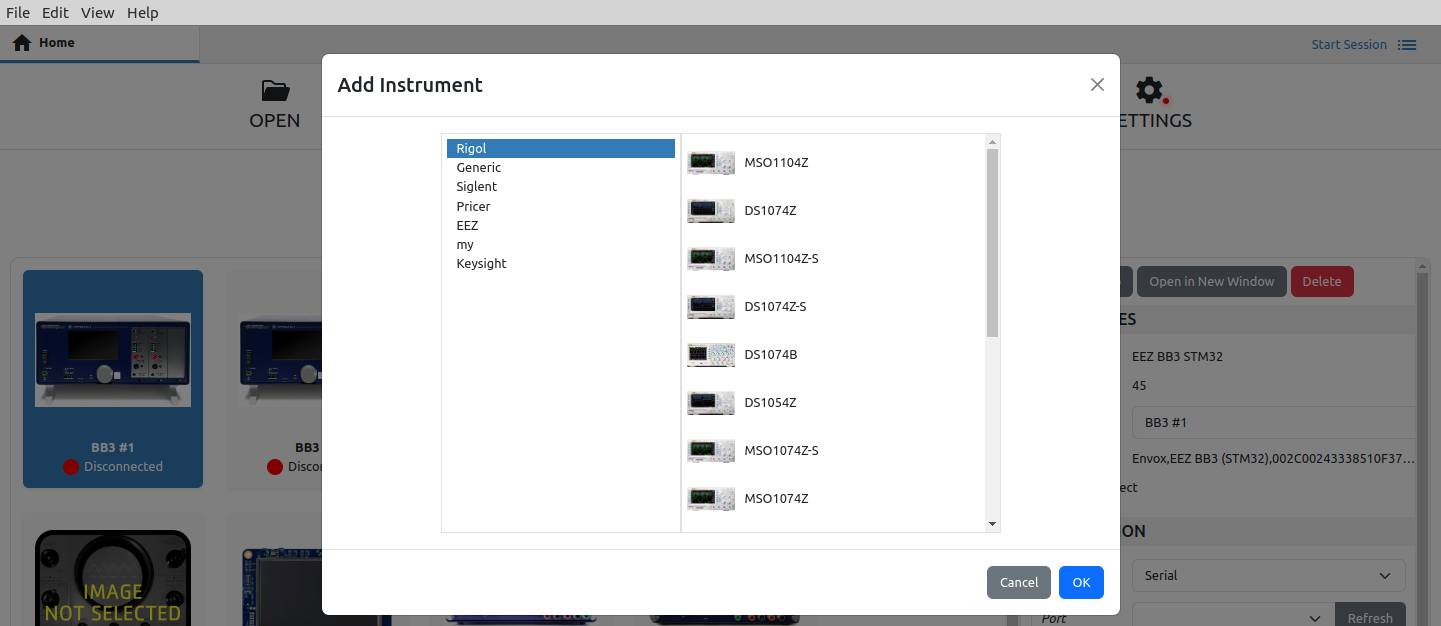
Fig. 22: Add instrument to workbench
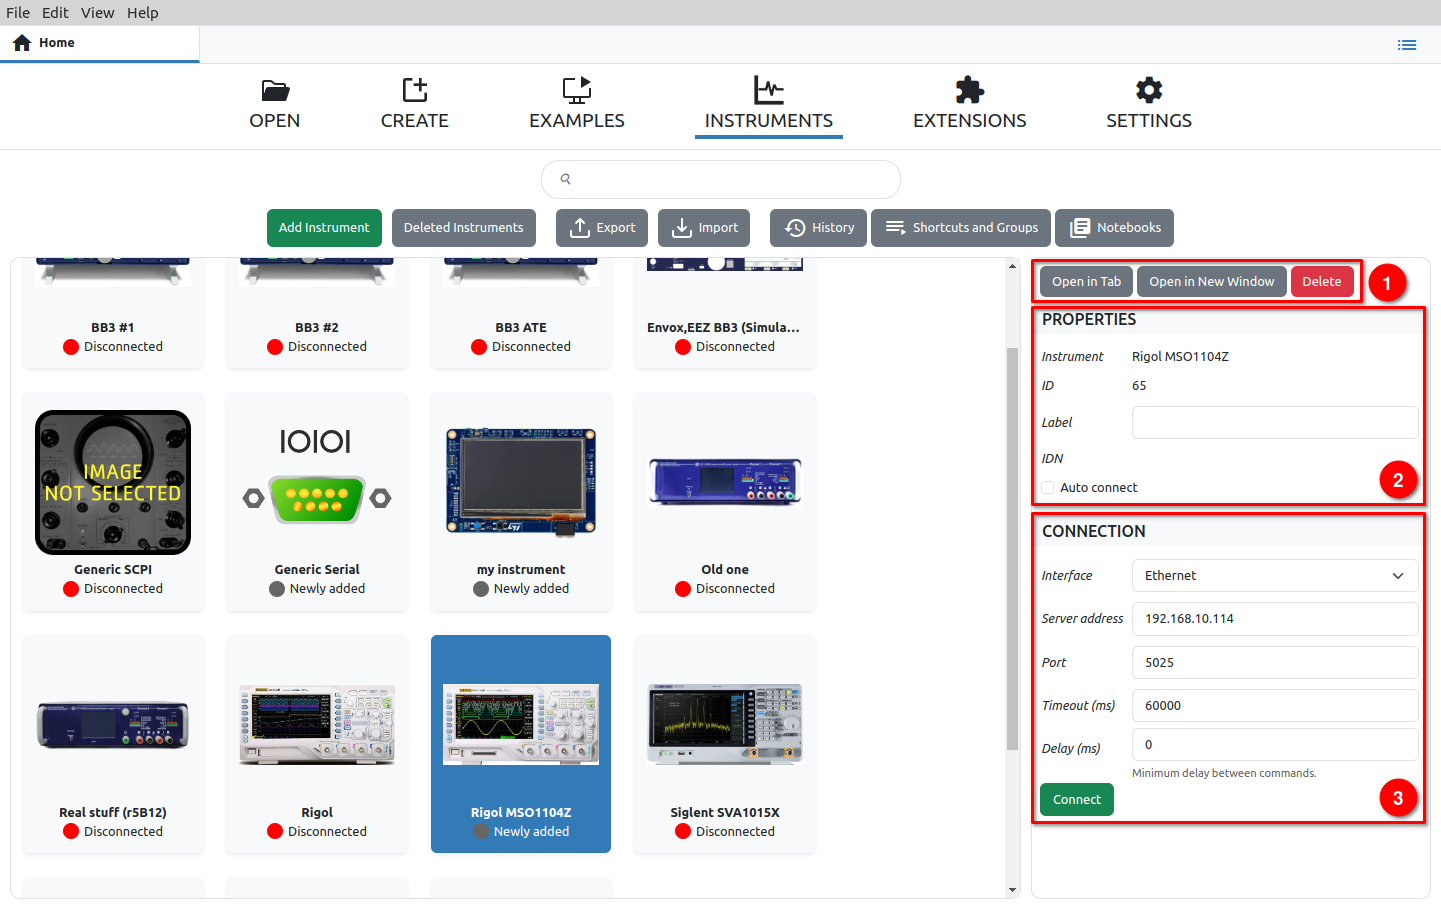
Fig. 23: New added instrument
A successfully added instrument will appear on the workbench (Fig. 23) with the label Newly added, and when selected, the sidebar will have the following sections:
|
# |
Option |
Description |
|
1 |
Actions |
Basic set of actions for displaying the instrument in a separate tab or new window and for removing it from the workbench. |
|
2 |
Properties |
The properties of the instrument contain information about the IEXT name, the internal ID, the instrument label that can be changed as desired, the identification string that the instrument returns in response to the SCPI query *IDN? and the option to automatically establish a connection with the instrument when starting EEZ studio. |
|
3 |
Connection |
Connection type. Connections to the instrument are defined in IEXT and there can be several of them. Depending on the type of connection (e.g. Serial, Ethernet, USBTMC, VISA), the associated connection parameters will also be displayed.
Please note that the USBTMC and VISA interfaces are experimental and may not work properly on your computer.
For normal communication via the VISA interface, it will be necessary to install a free R&S®VISA driver. In case it is not installed or there is some problem in communication with it, an error message will appear as in Fig. 24. 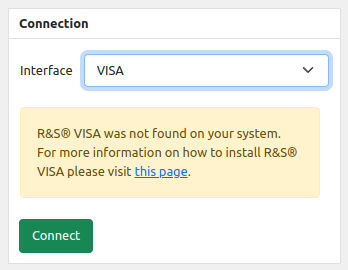 Fig. 24: VISA driver error message
|
I1.7. Establishing a connection with the instrument
Connection to the instrument added to the workbench will be possible as shown in Fig. 25: select the instrument from the workbench (1), select the interface in the Connection section (2) and click the Connect button (3).
If the Instrument tab (1) is open, as shown in Fig. 26 to establish a connection, it will be necessary to click on the Connect button (2) when a dialogue for choosing an interface will open in which the connection parameters are defined.
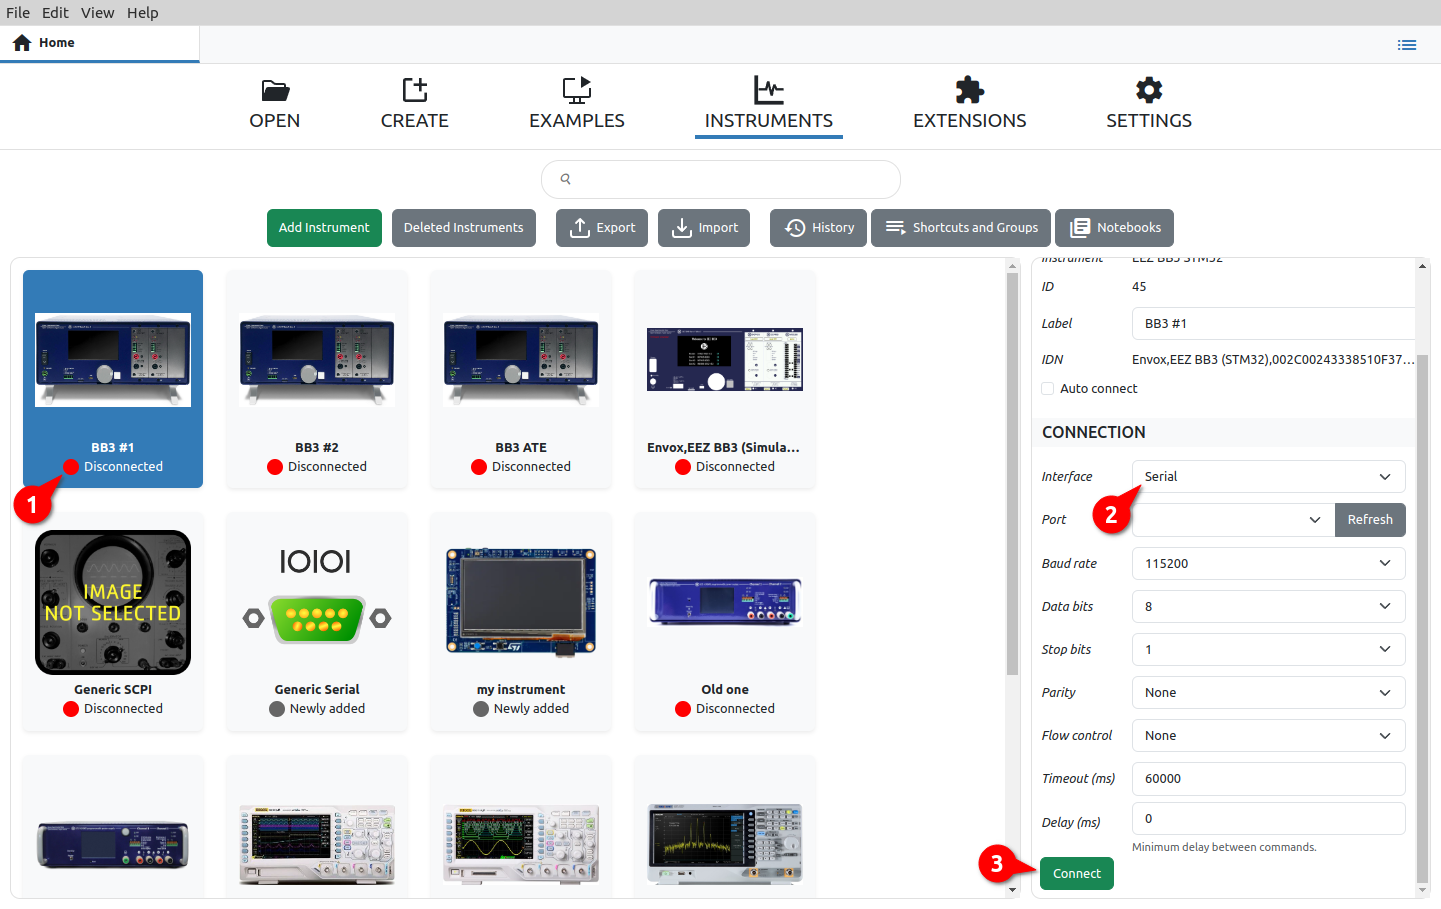
Fig. 25: Selecting an instrument on the workbench to establish a connection
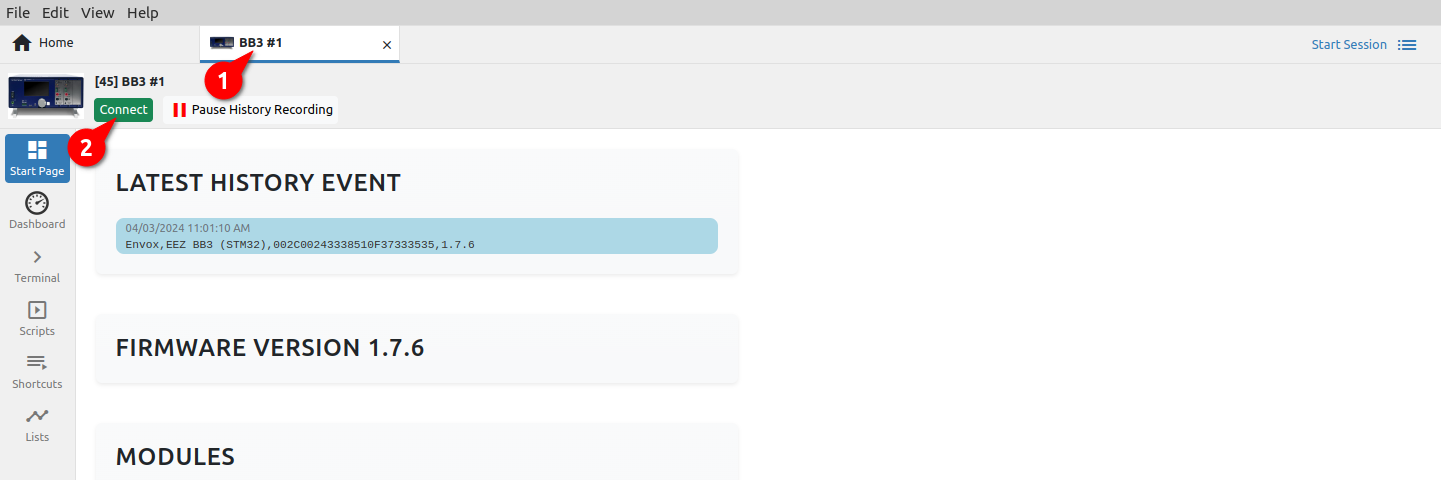
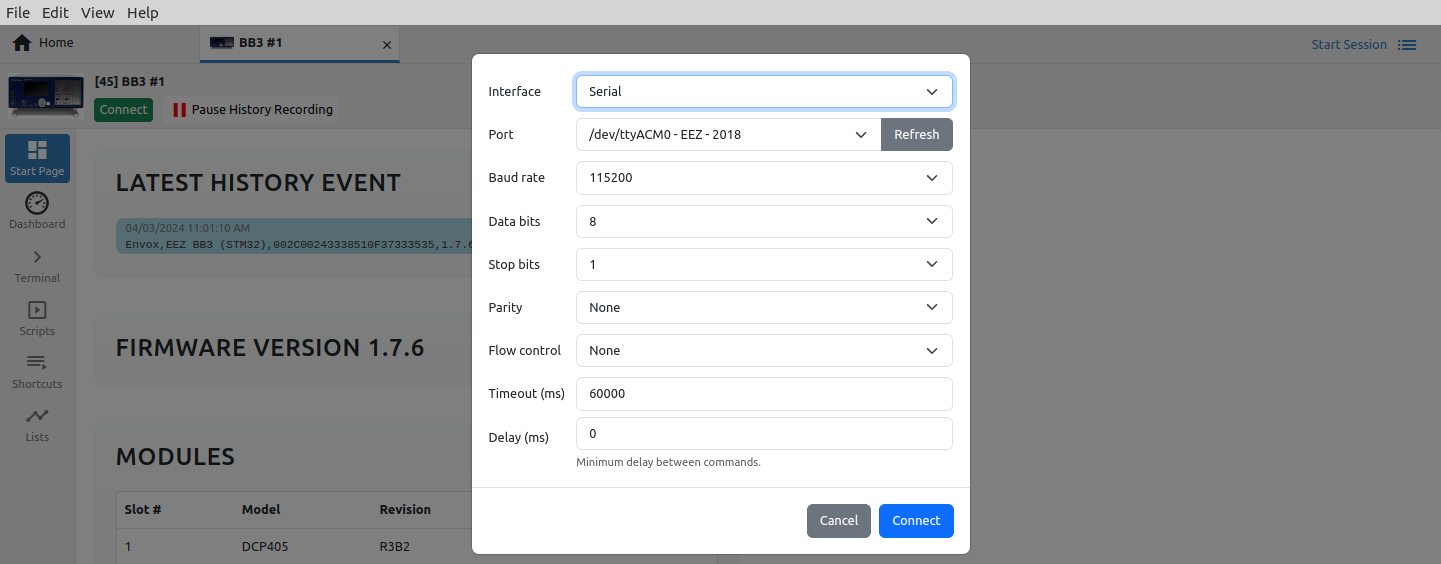
Fig. 26: Establishing a Connection from the Instrument tab
Once the connection is established, it will be possible to close the connection by selecting the Disconnect button (Fig. 27).
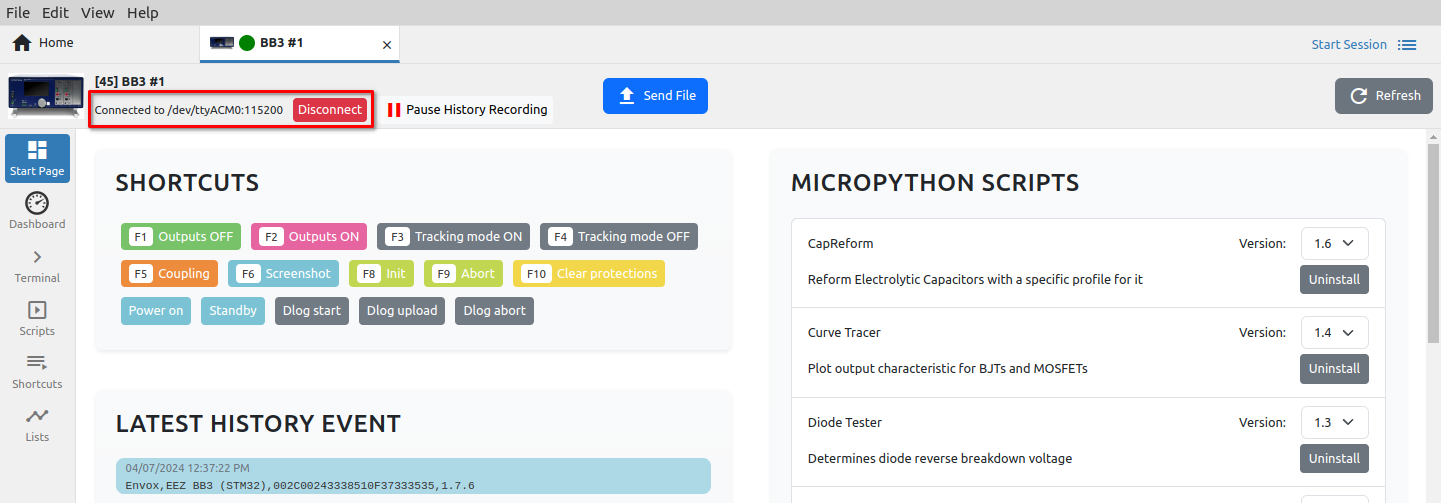
Fig. 27: Option to close the connection
I1.8. Export
The Export feature enables the export and archiving of data from the currently active database. It is possible to export data belonging to one or more instruments or sessions.
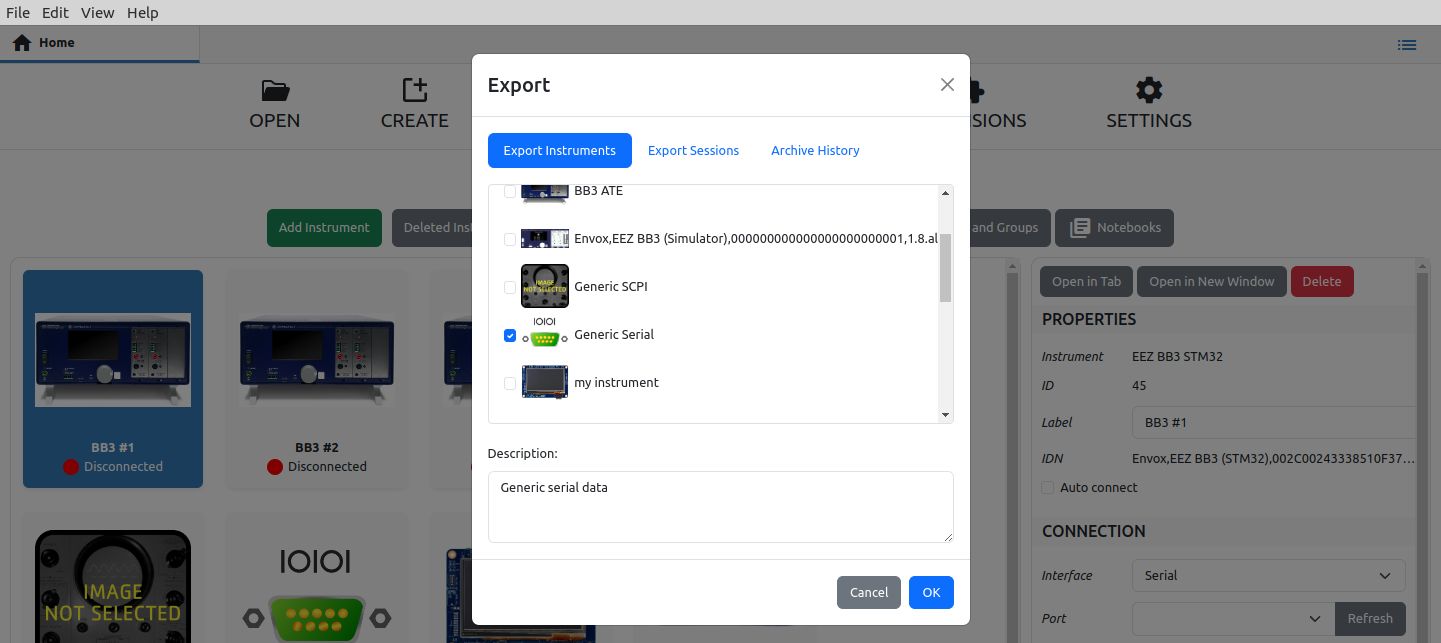
Fig. 28: Export of selected instruments to a new database file
When exporting, it is necessary to fill in the Description field with the text that will be seen during import. In Fig. 28 shows an example of data export of one instrument, and Fig. 24 is an example of exporting multiple sessions.
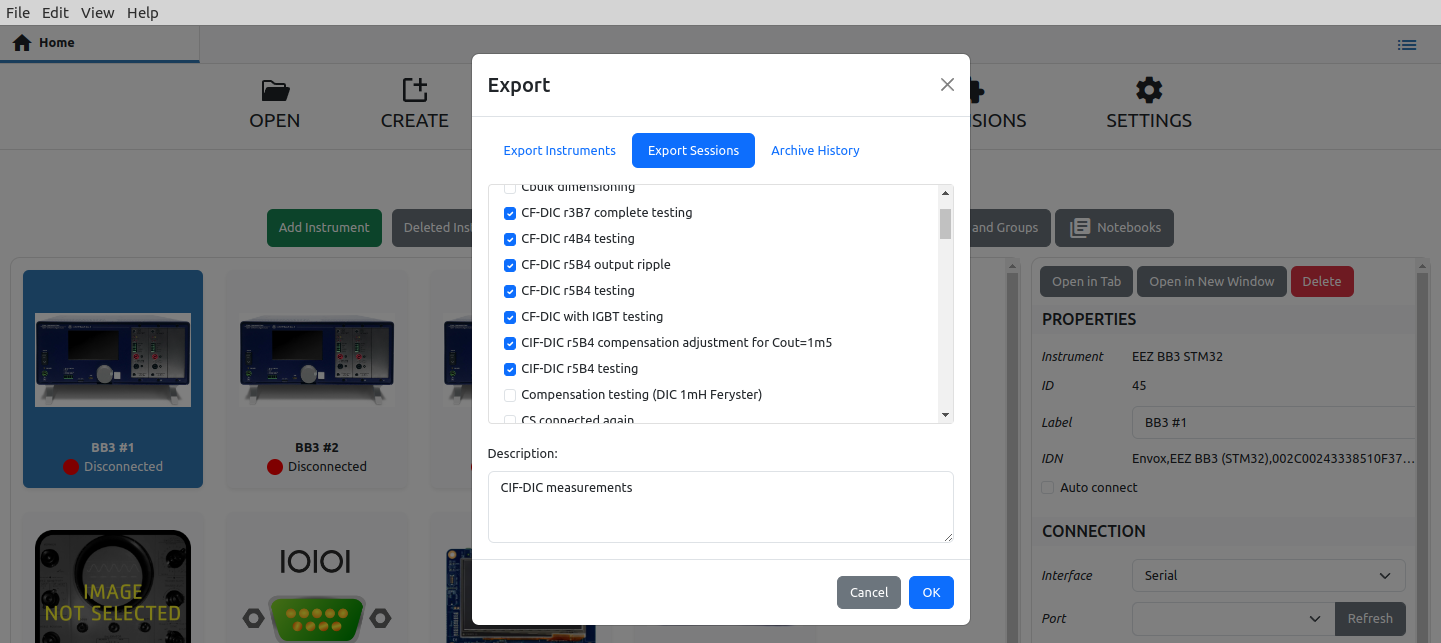
Fig. 29: Export of selected sessions to a new database file
When archiving, it is possible to choose whether the data will be deleted from the database after the archive. In Fig. 30 shows an example of archiving for the last 6 months.
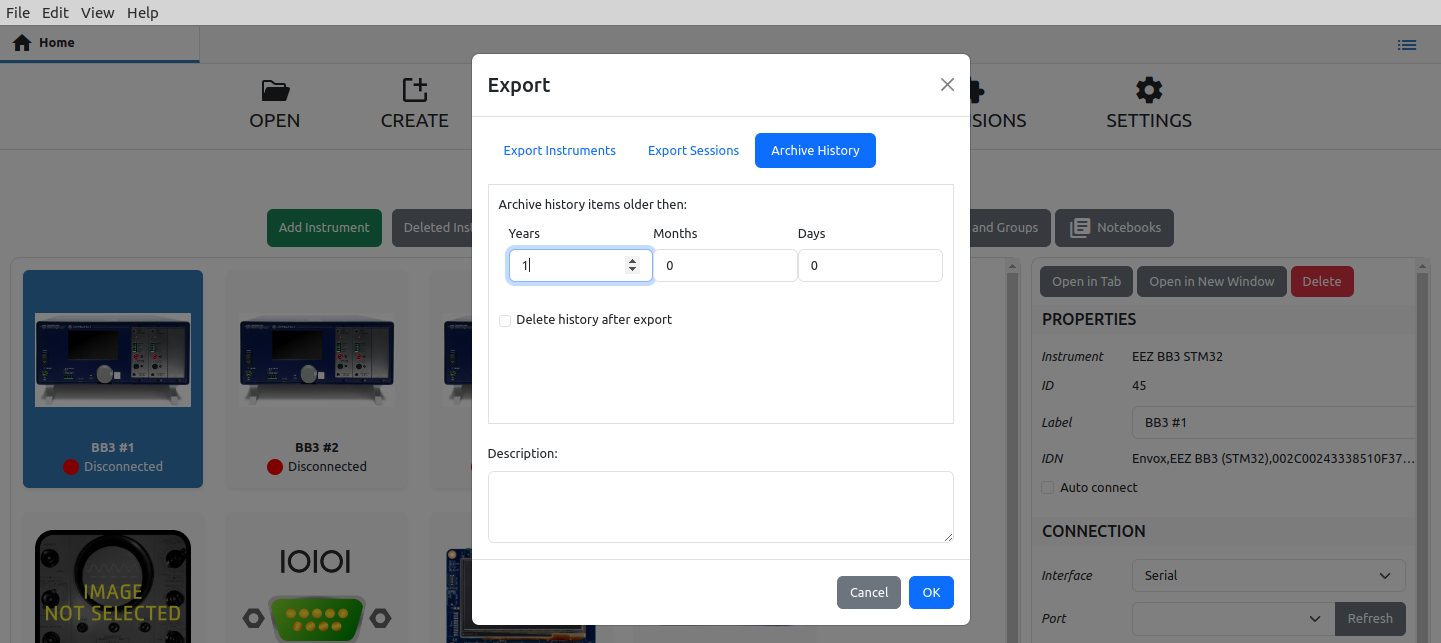
Fig. 30: Data archiving for a selected period of time
I1.9. Import
The Import feature enables the import of data that we have previously exported or archived. It can also be data that we received from a third party.

Fig. 31: Data import into the active database
By selecting this option, a dialog box for selecting the .db file will first be opened, and if the format is good, another dialog box will be displayed as shown in Fig. 31 for import confirmation.