13. Firmware upgrade
The EEZ BB3 (i.e. MCU module) firmware is not protected and can be upgraded when a new version is released. In addition, most of the peripheral modules have their own MCU, which is also advisable to upgrade with newer versions. The upgrade procedures for these firmware are different as described in this chapter.
Important notice: If you are upgrading the firmware from a version older than 1.6 to 1.6 or later according to the instructions below, the following message will appear on the first restart only:

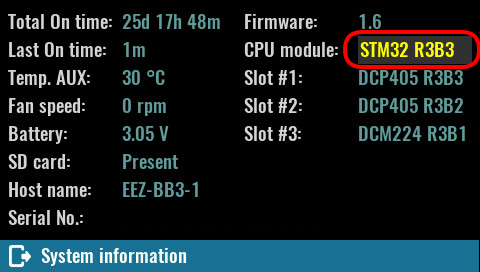
If you got BB3 as a kit through a Crowd Supply crowdfunding campaign and the color of the MCU module PCB is green, choose r2B4 (the newer version of r3B3 has a PCB in blue). If you accidentally select the wrong revision of the MCU module, you can correct it later on the System information page.
13.1. MCU module firmware upgrade version greater than 1.7.1.
All models shipped from July 1, 2021 onward come with a custom bootloader that allows easy firmware updates using only the EEZ Studio application version 0.9.84 or newer that will detect new firmware versions and offer upgrade. If you have a firmware version older than 1.7.1 you will need to go through the procedure listed in section 13.2.
When connecting to the EEZ BB3, EEZ Studio will check which firmware version is currently installed. This will be visible in the Firmware version section under the Start Page tab. An internet connection will be also required to access the latest firmware versions. If the latest version newer than the installed one is detected, the Upgrade button will appear. Selecting it will start a fully automated installation procedure: transfer of firmware image and restart EEZ BB3, after which a bootloader will be started, delete the existing firmware and start flashing the new one.

13.2. MCU module firmware upgrade
This section describes the procedure for downloading firmware to EEZ BB3 (i.e. MCU module) from Linux and Windows operating systems using the USB DFU (Device Firmware Upgrade). Regardless of the operating system, the following steps will be required:
|
1 |
Disconnect any connected loads from all outputs and make sure that UART port (DIN1/DOUT1) is not used. Unplug also USB cable if connected. |
|
2 |
Download the latest firmware available at https://github.com/eez-open/modular-psu-firmware/releases |
|
3 |
Turn power off using the power switch on the front panel.
MCU r2B4 (i.e. green PCB): Keep the BOOT0 switch pressed while turning the power on. The BOOT0 switch is located in the lower left corner of the front panel. If the BOOT0 switch has been pressed long enough, EEZ BB3 enters DFU mode.
MCU r3B3: Keep the USER switch (right of encoder knob) pressed while turning the power on. EEZ BB3 enters DFU mode.
The existing firmware will be deactivated and the Welcome page will not be displayed. The cooling fan will stop spinning after few seconds. |
|
4 |
Now connect EEZ BB3 to PC using USB cable. The connector on the EEZ BB3 side should be of USB Mini type. |
Table of content:
- MCU module firmware upgrade on Linux
- MCU module firmware upgrade on Windows
- MCU module firmware upgrade on Mac OSX
- Peripheral module firmware upgrade using EEZ Studio
- Peripheral module firmware upgrade using GUI on EEZ BB3
13.2.1. Linux
The procedure described below is made on Ubuntu 18.04 LTS and may be somewhat different with other Linux distributions. DFU is an official USB device class specification. It is natively supported by Linux. Therefore, no additional driver will need to be installed.
|
1 |
You can check if Linux correctly identified EEZ BB3, which must be in DFU mode. Open the terminal application and enter:
A list of all connected and recognized USB devices will be displayed. If EEZ BB3 is properly connected and enters DFU mode a red marked line should appear.
Bus 004 Device 002: ID 174c:55aa ASMedia Technology Inc. ASM1051E SATA 6Gb/s bridge, ASM1053E SATA 6Gb/s bridge, ASM1153 SATA 3Gb/s bridge Bus 004 Device 001: ID 1d6b:0003 Linux Foundation 3.0 root hub Bus 003 Device 002: ID 046d:c077 Logitech, Inc. M105 Optical Mouse Bus 003 Device 001: ID 1d6b:0002 Linux Foundation 2.0 root hub Bus 002 Device 001: ID 1d6b:0003 Linux Foundation 3.0 root hub Bus 001 Device 108: ID 0483:df11 STMicroelectronics STM Device in DFU Mode Bus 001 Device 103: ID 1a40:0101 Terminus Technology Inc. Hub Bus 001 Device 003: ID 04d9:1400 Holtek Semiconductor, Inc. PS/2 keyboard + mouse controller Bus 001 Device 006: ID 8087:0025 Intel Corp. Bus 001 Device 004: ID 046d:081b Logitech, Inc. Webcam C310 Bus 001 Device 002: ID 1a40:0101 Terminus Technology Inc. Hub Bus 001 Device 001: ID 1d6b:0002 Linux Foundation 2.0 root hub |
|
2 |
Install dfu-util (you need sudo access rights):
|
|
3 |
Run dfu-util in folder where firmware image is downloaded:
|
|
4 |
Wait until the firmware image download is complete. A typical dfu-util output is shown below.
dfu-util 0.9
Copyright 2005-2009 Weston Schmidt, Harald Welte and OpenMoko Inc. Copyright 2010-2016 Tormod Volden and Stefan Schmidt This program is Free Software and has ABSOLUTELY NO WARRANTY Please report bugs to http://sourceforge.net/p/dfu-util/tickets/
Match vendor ID from file: 0483 Match product ID from file: 0000 Opening DFU capable USB device… ID 0483:df11 Run-time device DFU version 011a Claiming USB DFU Interface… Setting Alternate Setting #0 … Determining device status: state = dfuERROR, status = 10 dfuERROR, clearing status Determining device status: state = dfuIDLE, status = 0 dfuIDLE, continuing DFU mode device DFU version 011a Device returned transfer size 2048 DfuSe interface name: "Internal Flash " file contains 1 DFU images parsing DFU image 1 image for alternate setting 0, (2 elements, total size = 901464) parsing element 1, address = 0x08000000, size = 504 Download [=========================] 100% 504 bytes Download done. parsing element 2, address = 0x08000200, size = 900944 Download [=========================] 100% 900944 bytes Download done. done parsing DfuSe file |
|
5 |
Disconnect USB cable and recycle power using the front panel power switch. |
Alternatively it is possible to download .hex firmware image:
|
1 |
First, the .hex firmware image has to be converted into .bin format. If the firmware file name is bb3.bin, use the following command:
|
|
2 |
dfu-util -a 0 -s 0x08000000:leave -D bb3.bin
Wait until the firmware image download is complete. A typical dfu-util output is shown below.
dfu-util 0.9
Copyright 2005-2009 Weston Schmidt, Harald Welte and OpenMoko Inc. Copyright 2010-2016 Tormod Volden and Stefan Schmidt This program is Free Software and has ABSOLUTELY NO WARRANTY Please report bugs to http://sourceforge.net/p/dfu-util/tickets/
dfu-util: Invalid DFU suffix signature dfu-util: A valid DFU suffix will be required in a future dfu-util release!!! Opening DFU capable USB device… ID 0483:df11 Run-time device DFU version 011a Claiming USB DFU Interface… Setting Alternate Setting #0 … Determining device status: state = dfuERROR, status = 10 dfuERROR, clearing status Determining device status: state = dfuIDLE, status = 0 dfuIDLE, continuing DFU mode device DFU version 011a Device returned transfer size 2048 DfuSe interface name: "Internal Flash " Downloading to address = 0x08000000, size = 919352 Download [=========================] 100% 919352 bytes Download done. File downloaded successfully dfu-util: Error during download get_status |
13.2.2. Windows
|
1 |
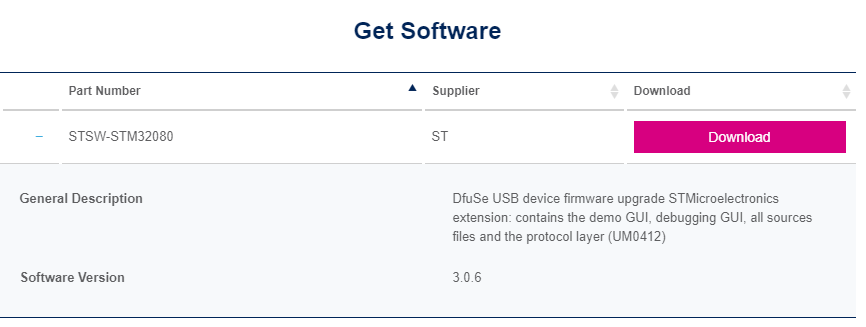
Visit the following page https://www.st.com/en/development-tools/stsw-stm32080.html and select en.stsw-stm32080.zip download. You may be required to register and login on the ST web site first. |
|
|
2 |
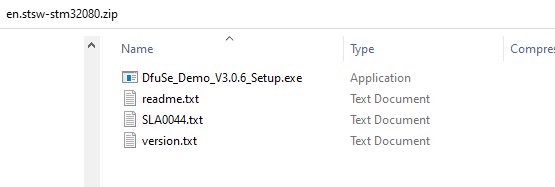
Unzip en.stsw-stm32080.zip and start installation of DfuSe_Demo_V3.0.6_Setup.exe |
|
|
3 |
Connect EEZ BB3 to your PC using a USB cable. The connector on the EEZ BB3 side should be of USB Mini type. |
|
|
4 |
Turn power off using the power switch on the front panel and keep the BOOT0 switch pressed when power is turned on. The BOOT0 switch is located in the lower left corner of the front panel. If the BOOT0 switch has been pressed long enough, EEZ BB3 enters DFU mode and the existing firmware will be deactivated and the Welcome page will not be displayed. The cooling fan will stop spinning after few seconds. |
|
|
5 |
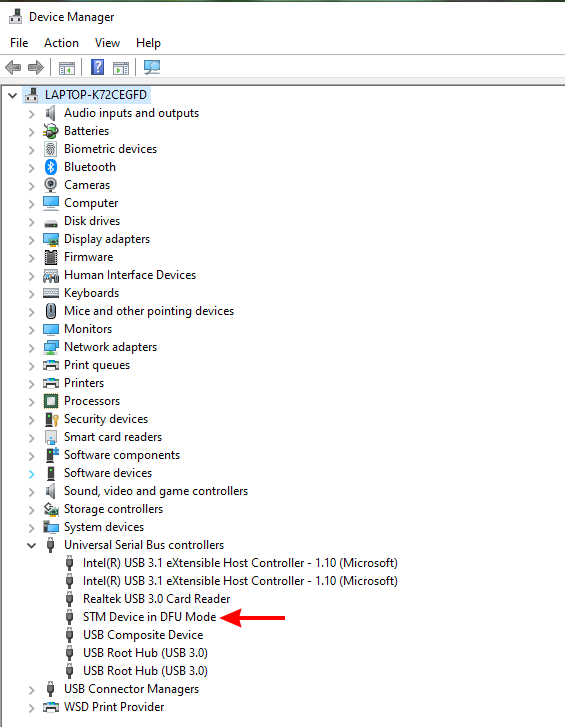
Check if Windows recognizes the EEZ BB3 as a device in DFU mode. It should be listed in Device Manager under Universal Serial Bus controllers section as STM Device in DFU mode.
|
|
|
|
If the EEZ BB3 USB is not recognized you have to install its driver manually from the following location (64-bit):
C:\Program Files (x86)\STMicroelectronics\Software\DfuSe v3.0.6\Bin\Driver\Win7\x64
or for 32-bit at
C:\Program Files (x86)\STMicroelectronics\Software\DfuSe v3.0.6\Bin\Driver\Win7\x86
|
|
|
6 |
Start the DfuSe Demo, select the Choose button under Upgrade or Verify Action section to load bb3.dfu firmware image. A message should appear if firmware image is loaded successfully.
|
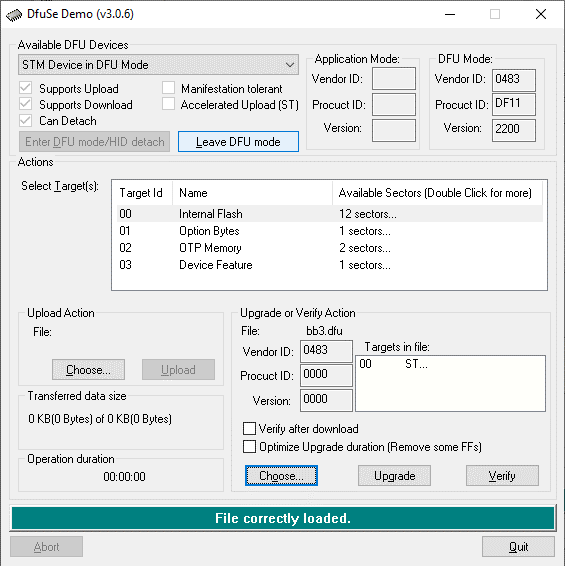
|
|
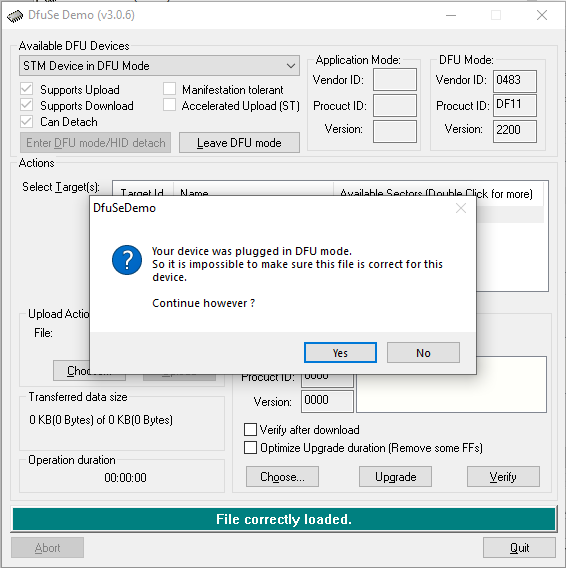
7 |
Select the Upgrade button under the same Upgrade or Verify Action section and select Yes when message box with question appears. |
|
|
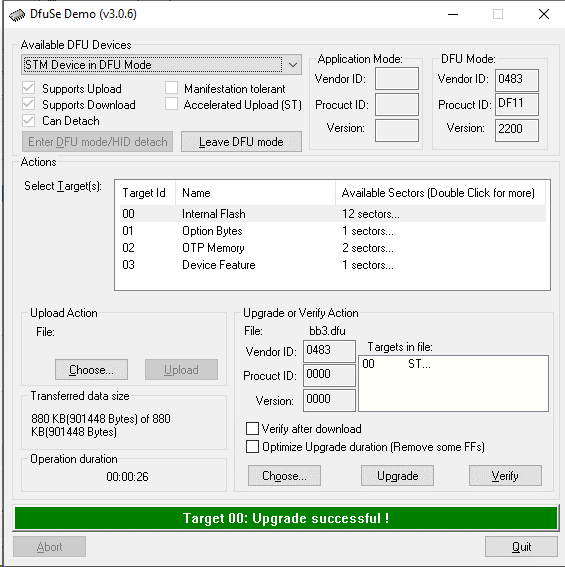
8 |
Wait until the firmware upgrade is complete. |
|
|
9 |
Disconnect USB cable and recycle power using the front panel power switch. |
|
13.2.3. Mac OSX
|
1 |
Press Command+Space and type |
|
2 |
Run in Terminal app: If the screen prompts you to enter a password, please enter your Mac’s user password to continue. When you type the password, it won’t be displayed on screen, but the system would accept it. So just type your password and press Enter/Return key. Then wait for the command to finish. |
|
3 |
Start installation: |
|
4 |
Run dfu-util in folder where firmware image is downloaded: |
|
5 |
Wait until the firmware image download is complete. A typical dfu-util output is shown below. dfu-util 0.9
Copyright 2005-2009 Weston Schmidt, Harald Welte and OpenMoko Inc. Copyright 2010-2016 Tormod Volden and Stefan Schmidt This program is Free Software and has ABSOLUTELY NO WARRANTY Please report bugs to http://sourceforge.net/p/dfu-util/tickets/
Match vendor ID from file: 1209 Match product ID from file: 2018 Opening DFU capable USB device… ID 0483:df11 Run-time device DFU version 011a Claiming USB DFU Interface… Setting Alternate Setting #0 … Determining device status: state = dfuERROR, status = 10 dfuERROR, clearing status Determining device status: state = dfuIDLE, status = 0 dfuIDLE, continuing DFU mode device DFU version 011a Device returned transfer size 2048 DfuSe interface name: "Internal Flash " file contains 1 DFU images parsing DFU image 1 image for alternate setting 0, (2 elements, total size = 1201048) parsing element 1, address = 0x08000000, size = 504 Download [=========================] 100% 504 bytes Download done. parsing element 2, address = 0x08000200, size = 1200528 Download [=========================] 100% 1200528 bytes Download done. done parsing DfuSe file |
|
6 |
Disconnect USB cable and recycle power using the front panel power switch. |
13.3. Peripheral module firmware upgrade
Upgrading the peripheral module firmware can be done in two ways by following the step by step procedures described below. As with the MCU module firmware upgrade, disconnect any connected loads from all outputs because after the firmware upgrade is complete, all peripheral modules will be reset.
13.3.1. Using EEZ Studio to upgrade peripheral module firmware
|
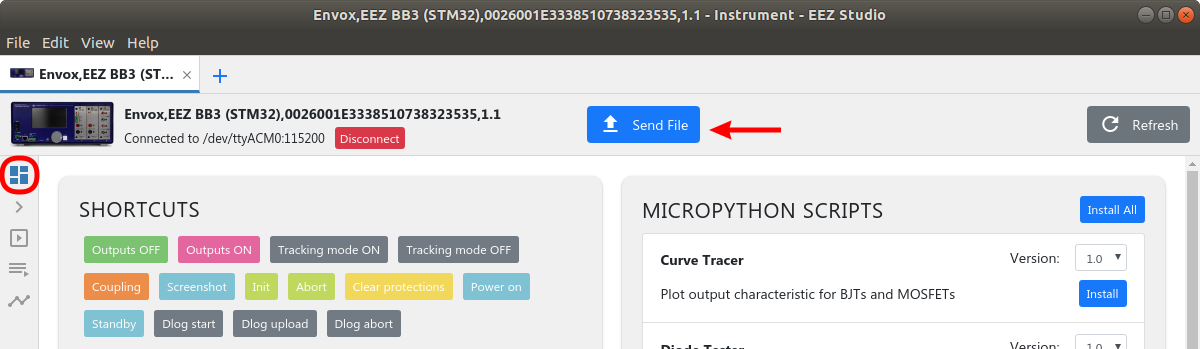
1 |
The easiest and fastest way to upgrade the firmware on a peripheral module is through EEZ Studio. When EEZ Studio is installed and communication with EEZ BB3 is established, it is a one-click action. If EEZ Studio is not installed, download the latest EEZ Studio available at https://github.com/eez-open/studio/releases and install it on your computer.
Important: A EEZ BB3 MCU module firmware version 1.1 or later is required to use this method and the computer on which EEZ Studio is running should have an active internet connection. |
|
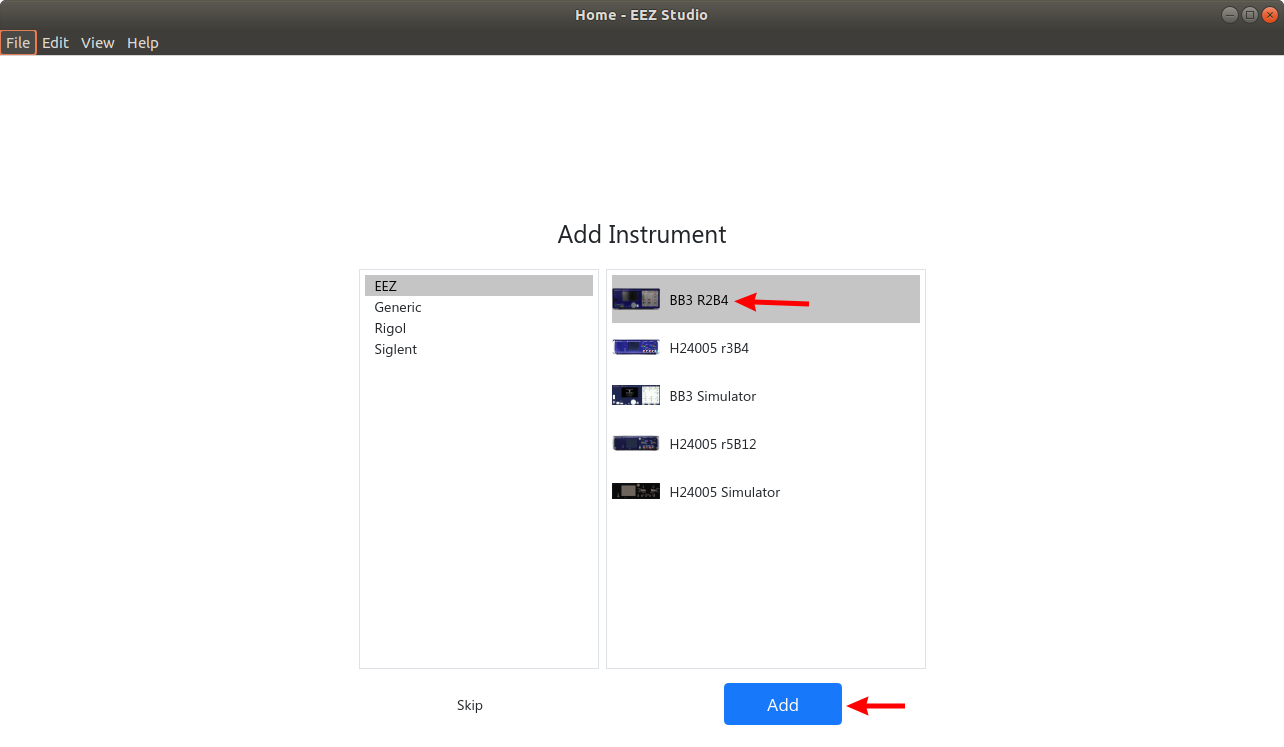
2 |
Start EEZ Studio and add EEZ BB3 from the list of preinstalled instruments on the Home page.
|
|
3 |
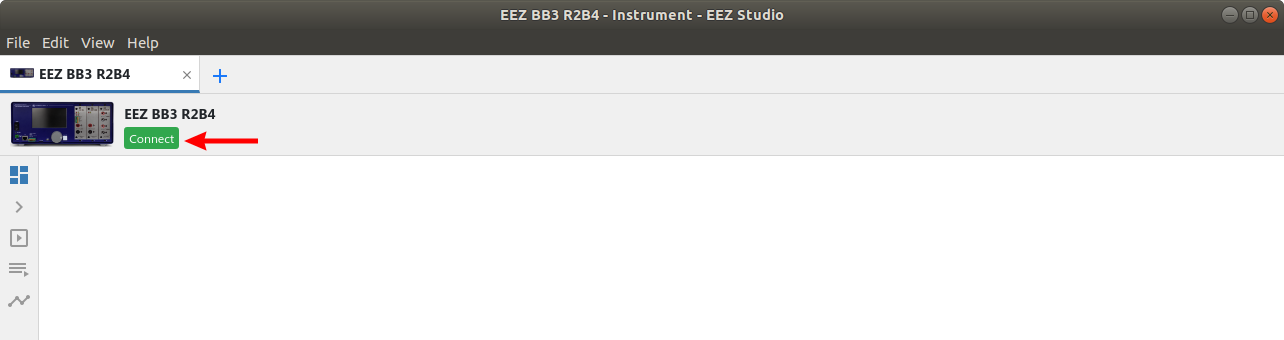
Select Connect option to open connection menu.
|
|
4 |
Select connection type, for USB choose Serial from Interface combo box. Click on Refresh button if EEZ – 2018 is not visible in the list of serial terminals.
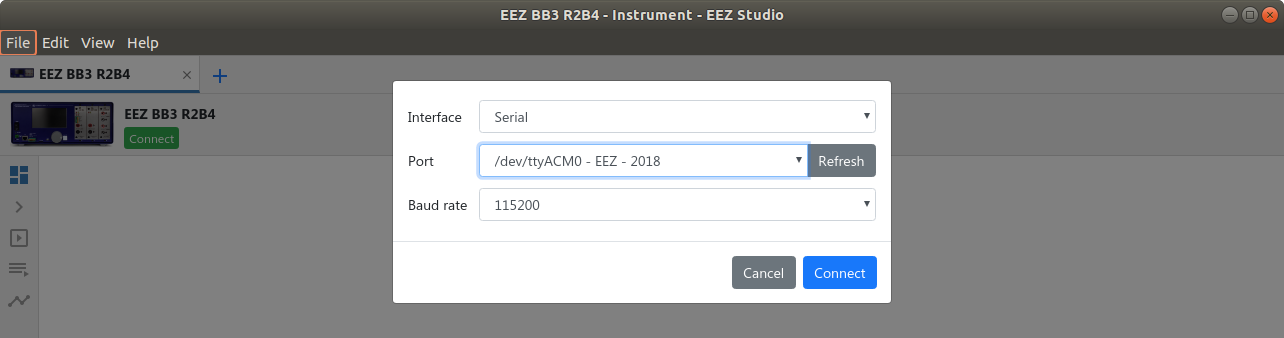
When Ethernet is selected as communication interface, the Server address has to be defined. Enter here EEZ BB3’s IP address (See Ethernet settings).
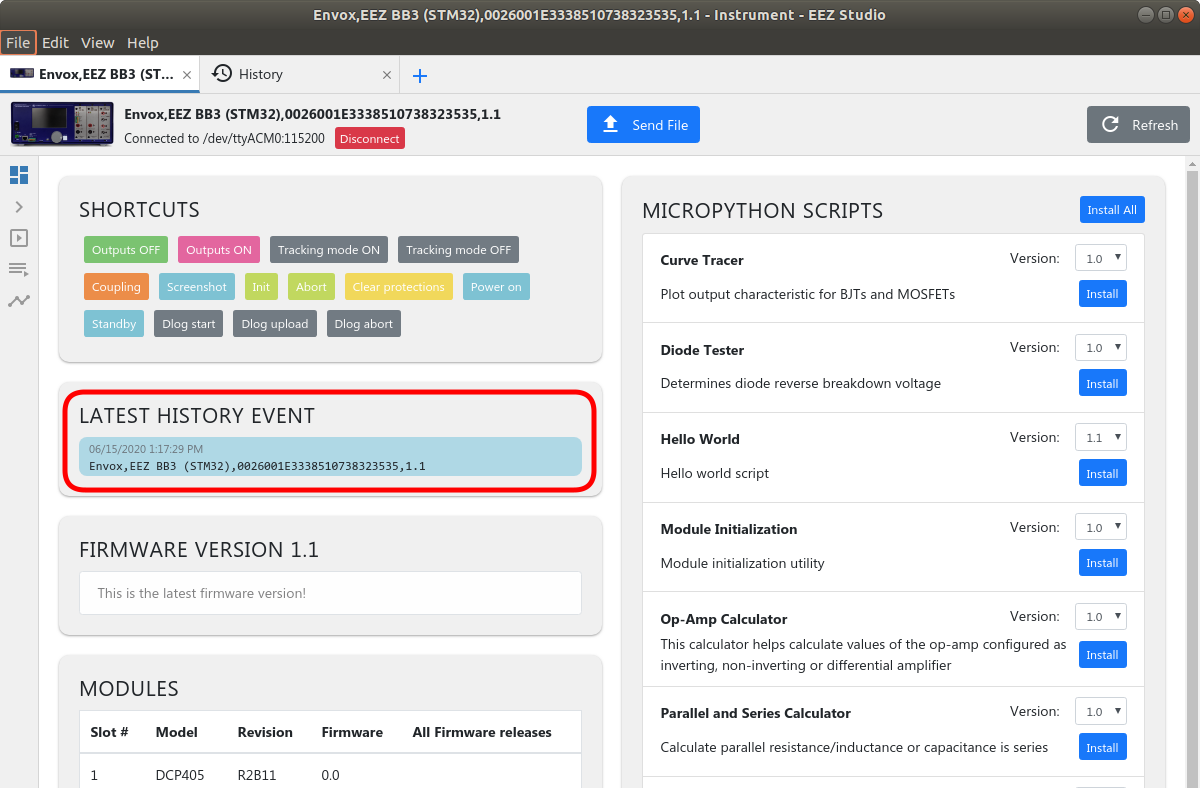
Successfully established connection is indicated by receiving identification string as response to *IDN? SCPI query that EEZ Studio will send automatically to the EEZ BB3 over the selected interface. The identification string can be seen in the Latest history event section.
|
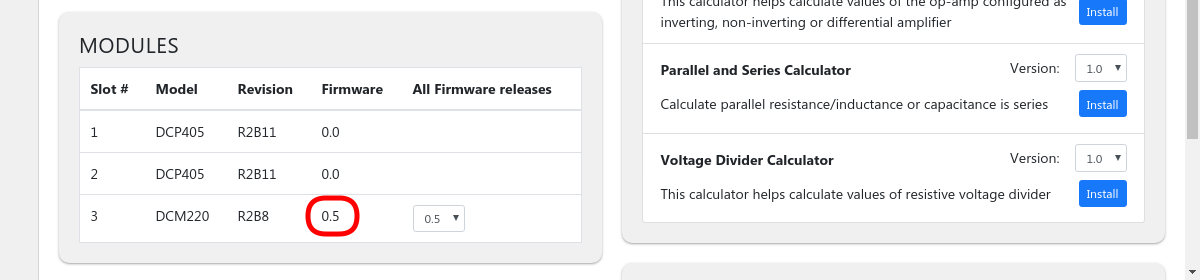
|
5 |
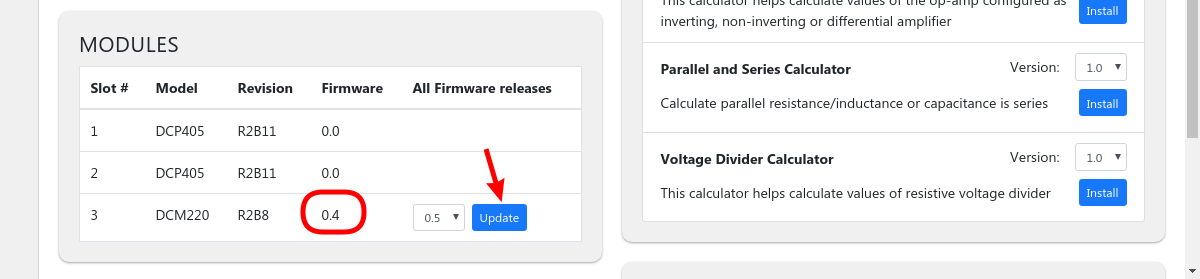
Scroll down to the Modules section where all recognized installed modules are visible. For modules that have an MCU, the version of the installed firmware will be displayed in the Firmware column. To download another firmware version, it will be enough to choose the one you want, click on the Update option and wait a few moments.
|
|
6 |
When the download is successful, the displayed firmware version will also be updated.
|
13.3.2. Upgrade peripheral module firmware using GUI on EEZ BB3
|
1 |
Visit https://www.envox.hr/eez/eez-bench-box-3/firmware.html for a list of all existing modules. Download the .hex file for the module whose firmware you want to upgrade. |
|
|
2 |
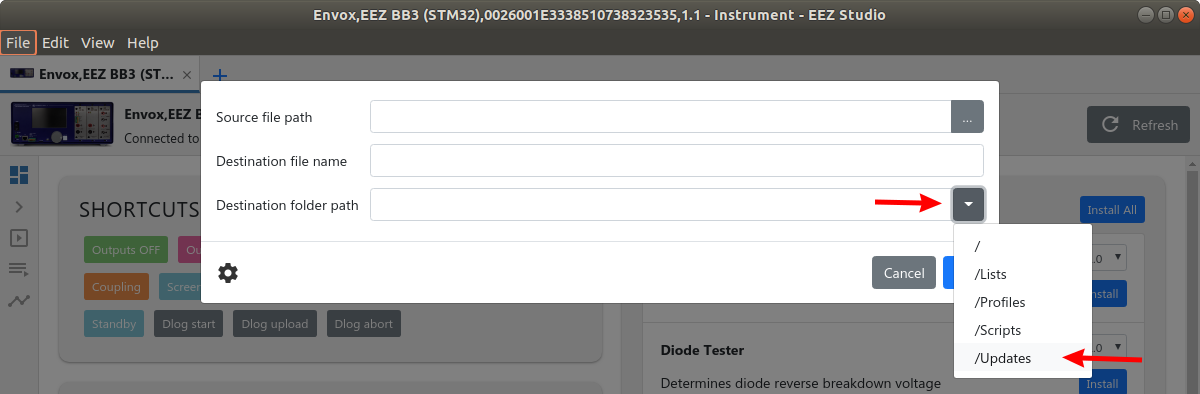
The selected .hex file will need to be transferred to the /Updates folder on the EEZ BB3 SD card. Since there is currently no option to mount the SD card as a USB mass storage you will need to remove the SD card and insert it into the SD card reader of your PC and skip to step . Alternatively, you can do this using the EEZ Studio and Send file option.
|
|
|
3 |
Make sure the Destination folder path is set to /Updates otherwise the peripheral module will not be able to find the firmware image file.
|
|
|
4 |
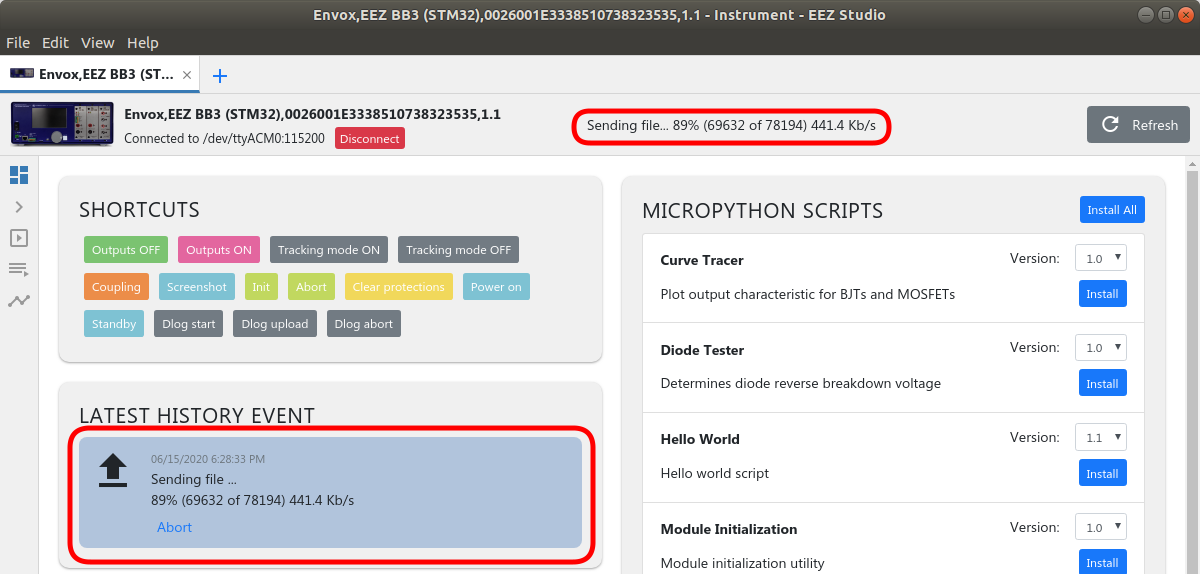
Wait until the file transfer is complete.
|
|
|
5 |
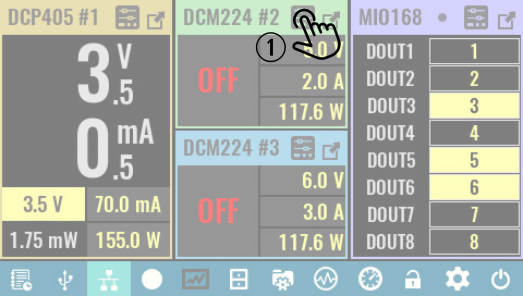
The procedure can now be continued on EEZ BB3 side. In the case of a dual channel DCM220 or DCM224 power module, it does not matter which channel will be used to get to the Protection and Settings page. In the example shown, a channel two was used.
First you need to tap on Settings icon. |
|
|
6 |
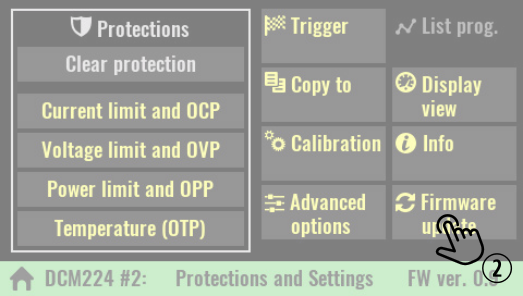
On the Protection and Settings page you can see the latest version of the firmware (FW ver.).
|
|
|
7 |
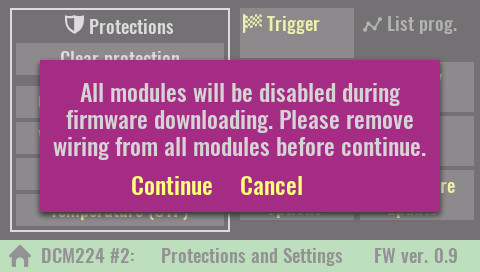
Selecting the firmware update option will first display a warning message. |
|
|
8 |
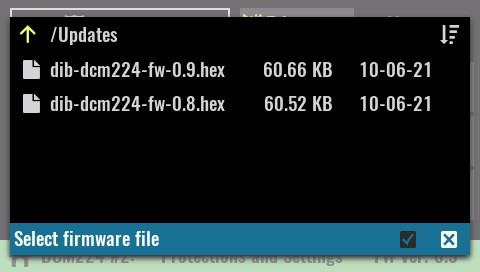
Finally, you will need to select the file that has been transferred and wait for the firmware download to complete. |
|